Hello, this is Goomzilla, and I'm going to show you how to make a Luigi plush!
...I mean, a Doopliss plush!
Doopliss is a Doppelganger from Paper Mario: The Thousand Year Door.
So he often goes around pretending to be someone he's not.
This is a relatively difficult tutorial, so check out some of my easier ones first, from the link on this card on screen.
You'll be needing felt colors of: lots of white, light blue, black and orange,
then also a needle, and thread in black and white at least, maybe orange,
scissors, nail scissors, pins
and stuffing.
TEXT: The template has changed a lot since this!
Our template this time is in two pieces:
One containing all the main cutouts; and one extra for the pieces which didn't fit on this page.
Now cut out the pieces onto the felt colors specified, and also cut out the correct number.
The "front" and "back of head" pieces overlap to save space,
so make sure you cut out all the shapes as follows:
The whole thing here counts as the front, and you want two of these.
Just the top part is for the back of the head, and you want another two of these like this.
The "rear" and "rear 2" pieces are very similar
Just cut them out like I'm doing here.
TEXT: When they're cut out:
The pieces which we want to keep especially neat are: the two blue strips, the orange stars,
the mouth and eyes, the tassels and the pupils.
Because these pieces will be obvious, and will show off your Doopliss.
When you get to the pupils, you'll find it easier to cut these free hand with nail scissors, than to use the template provided.
But it's there to give you a rough idea of the size.
Arrange all your cut-outs like this, so you can see them clearly.
TEXT: Sewing Part 1: The Face
Now we'll start the sewing.
Take the two front pieces and sew them together along the straighter of the two long edges.
Use blanket stitches along the whole edge, to make sure your stitches are strong.
Now take the two blue rectangle pieces. We're going to make these into a bow.
Fold one of them in half and place the midpoint of the second at the crease.
The idea is that we'll tuck in these two ends to make the loop of the bow.
To keep it all held together, sew along this line here first.
TEXT: Sew along here
I started off on the back,
and then use simple running stitches here, because they're hard to see,
and we care more about the aesthetics than the structural stability of the bow.
Continue your stitches along the sides, using them to link the two bow pieces together.
When you're done, spread out the two ends, and check it looks like this.
For the eyes, we'll add on the pupils.
Because they're so small, I decided to just go in and out of the orange with orange thread,
rather than in through the orange and out through the black.
If you have no orange thread, you might prefer to do it the second way there.
Now we'll put the facial features onto the face.
The bow should just touch the bottom of the face, with a small gap before the mouth,
and finally the eyes higher up.
Attach the bow first with just a few stitches in the center at the back.
For the mouth, use black thread and go in through the white and out through the black all the way around.
I attached the mouth before the bow, but that was a mistake.
For the eyes do exactly the same. Make sure you position them right where you want them.
Then you have a finished face!
TEXT: Sewing Part 2: The Hat
Next, we'll make Doopliss' party hat.
Attach each of the two tassels by putting a few loops of thread through the spike of the cone.
Then fold up the hat and sew along this line with blanket stitches.
Make sure you tuck tassels in beneath the stitches, or else they'll end up on the inside of the finished hat!
Turn it the right way out and attach the stars with running stitches.
Space out all four evenly, something like this.
Make sure you get right down to each corner, or else the stars will have flappy edges.
TEXT: Here I'm going back to a corner I missed earlier.
Then you've made the hat!
TEXT: Sewing Part 3: The Back
Take the two "back of head" pieces and sew them together a blanket stitches along their shortest edge.
Then pair up the "rear" and "rear 2" trapezia, and sew each pair together along the shortest edge.
That's the one which is slightly closer to a right angle than the other.
Do this for both, and you will end up with this.
Now you want to connect the larger of these two, the "rear 2" piece, onto the sheet piece, along the longest side of each.
Since it is such a long edge, use pins throughout.
Next, we're going to attach the "back of head" piece onto this piece
To check which way around it goes, line up the back of head pieces with the face piece.
If it's the wrong way, you should see it doesn't quite match up at the top.
If it's the right way, it's a better fit.
Then pin this onto the sheet piece just like before, making sure you're sewing on the bad side of each piece.
And also such the rear pieces beneath the rear 2 pieces.
Next we'll attach the fastener to this.
The purpose of this piece is to go on the inside of Doopliss, to make sure the back keeps its shape.
Fold up the middle two rows on the bad sides, and put the fastener somewhere around the middle of this gap,
attaching it with blanket stitches.
You might want to start off at the middle of the fastener, so your stitches don't go through to the other side.
Now for the flaps to go on the sides.
They slot adjacent to the fastener.
Inspect which way you'll want them so that the lengths are most similar,
and sew right over to the corner and back up.
You'll want to do this using the bad side of the plush again, and pins might help.
TEXT: Turn the flaps the right way out!
You can tend to the corners if they look a little odd,
by tucking them in and trimming the edges, being careful not to cut the thread.
Now your back is really starting to take shape!
TEXT: Sewing Part 4: Finishing off
Pair up the feet, and sew each pair together with blanket stitches along the curved edge.
Now we'll attach the back and front together.
Start off in the bottom corner and sew them together, up to the other bottom corner, with the bad sides facing out
This is the longest sewing section on the whole plush!
Now we need to attach the feet and base, which we'll do simultaneously.
Pin the base to the body at opposite sides, and judge the positioning of the feet,
leaving about this much gap between them.
TEXT: gap to centre
Make sure your feet are the right way out too, or else you'll end up with this disaster.
TEXT: So yeah, turn the feet the right way out first!
Just do the front half, because we need the back open so that we can turn it all the right way out.
TEXT: Don't sew up the feet hole or else we can't stuff it - just go around the edges.
We'll turn it the right way out now and stuff it.
The places to remember especially to stuff are the feet, and the corners of the sheet,
and the bit of sheet behind the fastener.
Be careful not to over-stuff the sheet, because we want it to flop down a bit.
Then the final seam needs to be sewn up with a ladder stitch.
Stuff is as you go along with the stitch.
We're not quite done, because there's still the hat to attach.
It will go near the center of the head, but slightly to one side.
I probably put it too far to the side here.
We'll do this by starting off underneath the hat, and doing a few sets of stitches scattered around the base.
I'm doing four sets of roughly ten stitches. Whatever is enough to keep it held together.
After two sets, add stuffing to the hat - only a light amount, just so it keeps its shape.
Make the fourth set on the back if you can, which I forgot to do here.
(It makes the stitches less noticeable when you finish off.)
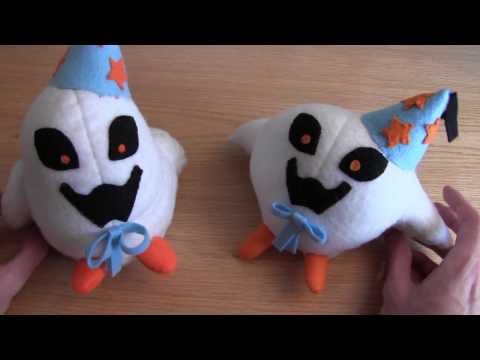
And now you have a Doopliss plush!
The first thing to note is just how much fatter this one is than the other!
This is because we thought the other looked a bit too "chicken-like", so I modified the sheet a lot.
The fastener was a new idea for keeping the back held together, and I think it worked really well.
Other than that, I probably should have placed the hat more centrally.
The feet turned out a bit too skinny, but I fixed that for your template.
Stitches around the base of the new Doopliss are better at least, more natural-looking.
Thanks for watching, and do send in your own Doopliss pictures,
so that I know you're making them, and that you want to see more tricky tutorials like this one.
Now we've made a friend for this Luigi...

 For more infomation >> [20170416] Nữ Thần make up cho Mặc Long (ಡωಡ) - Duration: 11:18.
 For more infomation >> how to make a mod for yandere simulator pt1 - Duration: 11:09.
  For more infomation >> Mushroom Manchurian Dry Recipe - How to make quick and easy mushroom manchurian - Duration: 13:53.


 For more infomation >> [VLOG] MAKE IT CREW EN ACTION ! - Duration: 8:02.




Không có nhận xét nào:
Đăng nhận xét