Start with cleaning.
Look only at what you need. :D
-------------------------------------------
How to make a Paper Wrist Watch, Origami Wrist Watch - Duration: 7:08.
How to make a Paper Wrist Watch
-------------------------------------------
😋 Простой рецепт ЗАВАРНОГО КРЕМА 😋 Как приготовить ВКУСНЫЙ КРЕМ? 😋 How to make CUSTARD? - Duration: 6:37. For more infomation >> 😋 Простой рецепт ЗАВАРНОГО КРЕМА 😋 Как приготовить ВКУСНЫЙ КРЕМ? 😋 How to make CUSTARD? - Duration: 6:37.
 -------------------------------------------
Dog House DIY - Amazing Cardboard House For a Dog (How to Make!) - Duration: 3:28.
How to Make Amazing Dog House out of Cardboard
-------------------------------------------
'He was going to make it': friends mourn life of 18-year-old crash victim - Duration: 2:59. For more infomation >> 'He was going to make it': friends mourn life of 18-year-old crash victim - Duration: 2:59.
 -------------------------------------------
How To Make Paw Art With Your Dog & Adopt Don't Shop - Duration: 4:38. For more infomation >> How To Make Paw Art With Your Dog & Adopt Don't Shop - Duration: 4:38.
 -------------------------------------------
How to Make Red Wine Risotto with Kale & Mushrooms by Rachael - Duration: 4:35.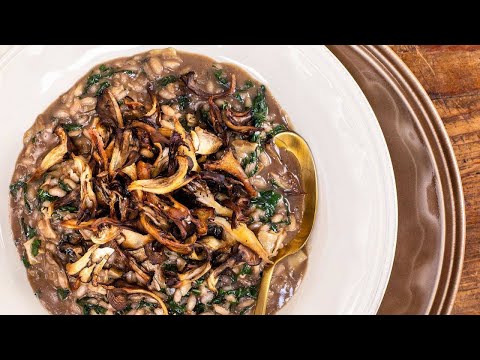 For more infomation >> How to Make Red Wine Risotto with Kale & Mushrooms by Rachael - Duration: 4:35.
 -------------------------------------------
How to make Red Rice Appam - Tamil - Duration: 2:55.
Hello friends
Today we are going to see how to make appam
It is special cause it is made of red rice
Come let's see what are the ingredients used
For measuring I am using this cup.
Please use one cup for all measurements
Red rice 1 cup
Idly rice 1 cup
Urad dal 1/4 cup
red poha 1/4 cup
Fenugreek 1/2 tea spoon
Now I am going to mix everything together
Instead of red rice you can use parboiled rice too
If using parboiled rice, use white poha instead
Now I am going to wash the mixture 3 or 4 times and show you.
I have washed 4 times and soaked in clean water
Let it soak for 6 hours and then we will see
After 6 hours I have put them in the grinder and we will see after grinding
After grinding the batter I am adding salt
I am using sea salt
After adding salt mix really good
Use your hands to mix the batter really good
Cause of this the batter will ferment nicely
Now we have to wait 8 more hours for the batter to ferment
The appam batter has fermented nicely
If it has not fermented, add baking soda
In my case I have not used baking soda since the batter has fermented nicely
It should be like this
running like water
Now I am going to cook the appam
The appam has cooked
If you see
It will come if you take with hand
Appam is ready
Try this recipe in your home as it is different
Usually people will use parboiled rice, we have used red rice instead
Everyone will like it for sure and it is healthy for the body
If you like this video
like and share
And do not forget to subscribe
Thank you
-------------------------------------------
How to make Aloo Tikki | Aloo Tikki Recipe | Crispy Aloo Tikki - Duration: 5:54.
Aloo Tikki is a popular north Indian snack made using mashed potatoes, spice powders and other basic ingredients.
The ingredients are shallow fried in cooking oil which gives a crispy and enjoyable taste.
In Western India, aloo tikki is also known as aloo patties.
The method of making them is same but the spices and the stuffing added in them differs according to the region.
Also aloo patties is usually not stuffed with any filling.
So let's see how it is done.
I've three medium sized potatoes
and by the way, there are two ways to make aloo tikkis, one is by stuffing chana dal
and the other one is by boiling potatoes.
So in this video, I'm going to be boiling the potatoes to prepare the aloo tikkis.
Now I'm going to put these potatoes into a presser cooker.
Pour some water for boiling the potatoes.
I'll close the lid
and switch on the stove.
I'm going to cook this on medium to high flame for about three whistles.
After three whistles, I'm going to turn off the flame.
Now don't open it right away.
Wait until all the pressure is released from the cooker.
I'll now open the lid
and looks like they are boiled good enough.
Ok, I'll transfer these boiled potatoes to a plate.
Now when these boiled potatoes are not hot enough, I'm going to peel off the skin.
Alright, I've peeled the skin from all of these potatoes.
I'm going to mash them using my hands or you can use masher.
Ok, we will now add 3 finely chopped green chilies,
1/4 teaspoon of turmeric powder,
1/2 teaspoon of red chili powder,
2 pinch of garam masala powder,
2 pinch of chat masala powder,
1 finely chopped onion,
few finely chopped coriander leaves,
2 tablespoons of rice flour,
2 teaspoons of bread crumbs
and salt as per taste.
I'll mix all of these together.
Alright, the aloo tikki mixture is ready,
and it should look like a chapathi dough.
Next step, we will make the tikkis out of this dough.
So first, grease your hands with some cooking oil
and take a small portion of this dough.
Now roll it and flatten the dough to a tikki shape.
Like this!
Ok, I have made them as flat thick tikkis.
But you can make them thick or thin, large or small as you prefer.
Last step, I'm going shallow fry these tikkis.
So, I've a skillet here and I'll add some cooking oil
and I'll allow the oil to heat for some time.
Now when the oil is hot enough, I'll now add them one by one.
Shallow fry them until they become brown in color on one side.
When they are brown on one side, flip them on the other side
and fry them till the other side also becomes brown in color.
Alright, it is done.
Let's take them out and transfer them into a plate
and they already look very yummy.
Garnish them with sliced Onions and these hot crispy aloo tikkis are good to enjoy with
green chutney made from green chilies and coriander or pudina,
and also with sweet chutney made from tamarind and jaggary.
In north India, aloo tikki is usually served with chole which is a spicy chickpea curry.
However, they can also be served with a cup of black tea or coffee.
I hope you like this video.
Please hit the like and subscribe button.
-------------------------------------------
How To Make Sambhar Masala | Home Made Sambhar Powder Recipe - Duration: 3:35. For more infomation >> How To Make Sambhar Masala | Home Made Sambhar Powder Recipe - Duration: 3:35.
 -------------------------------------------
Как сделать вкусную пиццу / How to make a great pizza - Duration: 1:58.
Peace to everyone!
You are on our channel SUNDRY.
Today we`re going to make the most original home-made pizza.
For the pizza you`ll need things you can find in every shop.
Which are: tomato paste, ketchup, mayonnaise, sausage, pickles, cheese, tomatoes, onion, seasoning
and the pizza dough from "Magnit".
To begin with, let`s make sauce.
To do it we have to mix mayonnaise, ketcup, tomato paste and seasoning.
Then we cut tomatoes. pickles, onions and grate the sausage.
Cover the dough with our sauce.
Then lay out tomatoes,
pickles,
onions,
our sausage,
grate sheese
and put in the oven for 20 minutes.
Here are the pizza!
Now we`ll taste our pizza.
The pizza is very tasty, juicy and well-baked.
Try to make this pizza and write in comments whether you liked it or not.
Tap the bell in order not to miss our new interesting videous.
Good luck)
-------------------------------------------
make rope by plastic bottle. - Duration: 1:21.
.
-------------------------------------------
How To Make Money Doing Very Little Work - Duration: 11:21.
Hey guys it's John Kevitz from Acquire Liberty thanks for spending your time
from here today. Today I have a website for you that's gonna show you how to
make some extra money from home whether it be a little bit of money or some part
time money but it's legit it's easy to do and you know what I actually shown
you another website where you could do the some time ago a couple months ago
but this one I think is just a little bit better but before we get into that I
want you to subscribe to my youtube channel click on that little Bell
notification so every time I make it upload you'll get to see it first
and remember if you no longer want to trade time for money and you all learn
how to make passive income click that link below on the top of the description
watch the free video you'll get to see how I started and thousands of other
people got started working from home full-time and generating passive income
that's the key to success folks all right guys all and you further ado let
me show you what I have for you today it is called phat llama dot-com right
almost anything now this is actually a really phenomenal site we all have
things are a house whether it be you know tools whether it be electrical
equipment entertainment systems whatever the case may be cameras that we don't
really use they're just kind of laying around a house we're not using it well
guess what there are people out there that could use your stuff right now
today and you can make money letting them use it because they don't want to
buy that those things and maybe they ranked and they don't have a house to
store things so they just want to use something once really cheap and you know
give it back to you cheap meaning you don't have to pay as much as going to
like Home Depot to get you know gardening tools or go to Best Buy to buy
like a $300 camera they're just gonna borrow off you for like a day or two
make a couple bucks off of them and they're gonna be happy because they will
do what they want to do sound good so let me just show you around the site
here a little bit it's really simple and there's this is the domain the main page
here and it says basically recently viewed items that I was looking at this
you know you got your drones you got your cameras you know 100 hours a day
depending on how you know awesome the camera is is a really high-end is it
lower end whatever the case may be you rent it according to the quality of the
product that you're actually letting people use now
earn up to $1,000 a month for renting out your stuff which is very possible
and very plausible and I'll show you that a lot of people actually made that
kind of money very soon I'm gonna show you that now see it says average fifty
dollars a week now out of all the thousands of people that use this
website on a weekly basis this is what they make on average fifty dollars a
week which is actually pretty respectable no I mean you got to keep in
mind you can make a lot more money doing this a week but it does take some effort
because you got to post things on here you got to be very detailed you gotta
take a lot of pictures you gotta take a lot of video there are some interactions
with people it does take effort okay you're not you know in a box where
you're doing this all by yourself you do have to interact with people and you
have to post a lot of things there in order to have success what I like about
this website - your items are protected now with that being said did some
digging on to this now let's just say you're someone who's lending things out
to people okay and this is you know your camera your you know garden tool over
the case maybe they're not going to reimburse you if there's a scratch or
ding on something they're just not going to do it but if they're basically saying
if it affects the quality or the ability for the equipment that you rent it out
to do the job it's supposed to do after you received it back from the person you
rented it out to then they will reimburse you up to $30,000 whatever the
value of the equipment is worth which is really phenomenal because the other
website I showed you which I'll leave a card up here in the video for you that
you can actually go back and look at that at that website as well but this
one here I actually just like it more just for that simple and plain reason
alone when the truth of the matter is I looked at this and honestly it does only
take a minute now the thing you have to keep in mind it takes a minute to set it
up but when you're doing these things you want it like provide as many
photographs as possible not only for the customer but you want to do it for
yourself so if there's any disputes or issues that come up as far as something
getting damaged where it doesn't work you can actually show the pictures in
your profile or in your account of the item that was rented out and the quality
that it was at and I would actually encourage you to go a little bit farther
than that if you're gonna rent out cameras or anything like that or
anything that's valuable to you I would actually take a video of that item
actually already working before you rent it out because they will look at the
time stamp and if it was working before you rented
it out that's another level of proof you'll have in order to get reimbursed
of it with anything that actually gets damaged and it doesn't happen that often
honestly after looking through this site it really doesn't but there's always
that slim chance that it does and you want to have you know your all your you
know you know t's crossed in your eyes data as they say here's a couple more
items that are just renting looking now seeing the quality of this Camrys in
that isn't as high as some of the others we saw up at the top of the page but
nine dollars a day ten dollars a day but it's free money you're letting
someone use something and you don't use anymore and you're just making free
money electric bikes you know scooters you know speakers one hundred sixty
dollars a day that's a nice one right projection screen thirty nine dollars a
day LED party light packages sixty dollars a day phenomenal stuff guys let
me look at the drones they have for sale fifty or four rental fifty dollars today
35 dollars a day depending on the quality of the drone here's actually
some of the top dogs let's go to the dealer leaderboard page and here we go
here look at this guy joined May 2018 not that long ago and he's already made
nine thousand one hundred forty one dollars now this guy is working his tail
off probably putting everything in anything he he has that he owns and he's
willing to run up there but he's probably posting every day he's probably
interacting every day he's putting tons of pictures up may possibly videos as
well but the guy's definitely a hustler you could tell and you can make some
serious cash doing this and this is obvious right there
now at the lower end of the of the leaderboard you're talking about the
lowest one sixteen forty six and this guy joined a person joined April 2017
this is actually pretty good money right guys really good money look at that nine
thousand one hundred forty one dollars he joined May of 2018 Wow
so I mean guys I mean the opportunity is there now let's browse now what you want
to do here is after you go here and look at the leaderboard I'll put all the
links in the page for you to actually take a look at this stuff you go down
here after you click on here for the top leaderboard just scroll down a little
bit more on the bait on the main page hit browse items and it takes you to
this page here and you can actually see all the things here on the left hand
side that you can actually categorize whatever you want to actually you know
sell or rent out rent look at your right look at this
Trump trombones Oh guys you just take it let's take a look at the yeah percussion
here we got percussions look drum set rentals $150 a day $92 a day
we got another than $35 day you know people who are just looking for drum
sets to rent them out he's using for a week or a gig they have they just need a
you know you know drum set for the day or whatever the case may be maybe they
used to play drums and now someone call them can you do this drum thing but you
got to bring your own drums you say oh I don't have the drum set right now so I'm
gonna go on this website I'm gonna rent this up this guy for 35 bucks for a $400
job hey it's money well spent for him right and plus you're making out money
making you know whatever it is $35 a day in this case and in this case getting
this really high-tech professional you'd make $150 a day if you own a drum set
but you guys get the point right so they pick it up they bring it back you check
for damages if there's any damages basically they would reimburse you for
you'd have to prove it like I said they're not gonna cover you for
scratches and dings and that kind of stuff they're just not going to do it to
list an item basically step 1 give your name item add some photos you go to next
and you you know you do a bunch of other details basically you know what you want
to rent it out for the location area and that sort of thing it's really really
simple stuff I mean filling this kind of stuff out does not take that long
probably the longest thing that will take you to do is taking the photos of
whatever it is you want to actually have them have rented out and I said I would
recommend that you actually take a video but actually working and using it as
well just for your own records in case something ever happens how long when
does lenders get paid key within 24 hours of the start of the day of the
rent oh this is normally hits your account about three to four working days
after the start date of the rental so if someone rents something out on Monday
probably by Thursday or Friday normal working business days you'll see
whatever money has coming to you at that point so that's actually not bad now
they use secure payment provider stripe I never heard of stripe before but I'm
assuming it's something like PayPal something that's very kind of rare you
don't see PayPal in here but this is actually US and UK based so keep that in
mind I don't think you do this anywhere else around the world I think it's just
for the United States and the United kingdom and that's pretty much it folks
and I mean here's a little bit more details about the guaranteed fa Q's and
a gig goes into a lot more detail but there's really not that much more detail
I basically told you the details of that but I would look into it if you're
seriously looking into get into this but guys listen that's all I have for you
today I hope this helped you out this is a good way for you to make some solid
good part-time money with very little effort involved I mean how would you
like to just set something up you know you could probably in 30 minutes you
could probably in theory setup you to anywhere between two to three of these
things then just have money coming in when you have someone come pick it up at
your house or the case maybe you wanted you know go to that house whatever the
case is nine times out of ten I would probably have them come to my house and
pick it up since they're the ones you know renting it off of me and from that
point forward there you're just making money off of it I mean that's really
awesome money and if at some point in time does not work and the functionality
of it does fail you let these guys know you show them the proof you get
reimbursed so you're really not going to lose but I think this is a really good
opportunity for those if you have a lot of stuff laying around the house is just
kind of sitting there not making any money and it can be so it's just
something keep in mind all right guys listen that's all I have for you today
if you would be so kind subscribe to my youtube channel click on that little
Bell notification so every time I make it upload you will see it first and
remember if you want to generate passive income for yourself you no longer want
to trade time for money click that first link in the bottom of the description
below watch the free video Co I got started and thousands of other people
got started and it gave them the ability to work from home and the best thing
about it is is you get a full fledge education on how to make money from home
that's key I love this program I fully endorse it you can watch my video about
how I make a thousand dollars a day in passive income you know actually by
having a card or in an end card and then in the video so you can watch that if
you are interested and you want to learn more and that's pretty much all I have
for you guys today and one more thing if you want to join my newsletter I
strongly encourage you because if you do it is the second link in the bottom of
the description block click on that link join my newsletter I usually give out
five news letters every week Monday through Friday sometimes on the weekends
depending on what it's all about but I give tips tricks and I give you the eyes
of the lay info on my latest YouTube video so you
get the information first all right guys listen that's all I got for you today ok listen
and until next time what do I we say I say God Bless guys take care and until
next time bye now.
-------------------------------------------
How to Make Old Fashioned Lemon Pound Cake - Duration: 5:42.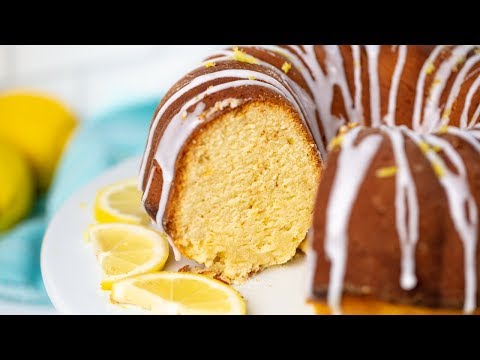
Today on The Stay At Home Chef I'm showing you how to make Old-fashioned
Lemon Pound Cake. It's easy to make and full of lemony goodness. You will love
this dense moist lemon pound cake. The first thing you want to do is pre-heat
your oven to 350 degrees Fahrenheit and grease a bundt cake pan really well and
I'm using shortening to grease mine but you can also use butter and I'm also
gonna dust this with flour to ensure that my cake does not stick. Bundt cakes
are notorious for sticking so make sure you do a really good job greasing and
flouring the pan. You can also use something called miracle pan release
Just google it and you'll get a recipe. It's basically a combination of flour
shortening and vegetable oil and your cake will come out clean every time. Next
we'll make our batter. We're gonna use a hand mixer to cream together 1 cup of
softened salted butter and 8 ounces of cream cheese. Now if you don't have cream
cheese you can also just replace that with another cup of butter and we're
gonna cream this together with a hand mixer until it's light and fluffy. After
about a minute of mixing you can go ahead and add in 2 cups or 1 pound , which
is why it's called a pound cake, of sugar. We'll mix that in until it's nice and
creamy. Traditional pound cake gets its name because it uses a pound each of
butter, sugar, eggs, and flour today. We're just doing a little variation on that
and adding in some lemony goodness. Next we're gonna add in 6 eggs and you want
to add those in one or two, in this case, at a time you want to mix in between
additions and just keep adding in those eggs until you've added in all 6. Then
we're gonna add in our lemony elements starting with 1/4 cup of freshly
squeezed lemon juice ,the zest from one lemon which is about a tablespoon to a
tablespoon and a half then I like to add in 1 teaspoon of lemon extract for a
little extra lemon flavor and finally
1 teaspoon of vanilla extract which kind of just enhances the flavor and gives you a nice
smooth clean taste. We're gonna mix this in real quick. Last we're gonna add in 1
pound of all-purpose flour which is about three cups. You want to add that in
just a little at a time, mixing between additions and don't forget that you want
to stop and scrape the sides and bottom of the bowl and make sure that
everything gets mixed in. You should end up with a nice thick batter. We're gonna
grab that bundt cake pan and pour our batter directly in and you want to
spread it out so that goes all the way around that center hole. I use my rubber
spatula to spread out the top and even things out and also give it a nice tap
to make sure there's no air bubbles. Then we're gonna bake this in a 350 degree
oven for about an hour and 15 minutes. It may take up to an hour and a half, so an
extra 15 minutes to bake it through completely. Once it's baked remove it
from the oven and let it cool for 15 minutes in the pan after 15 minutes you
want to invert the pan onto a wire rack and remove it so that the cake can cool
completely. Once the cake is completely cooled you can put together your lemon
icing it's really simple. You just need 1 cup of powdered sugar, 2 tablespoons of
lemon juice, and half a teaspoon of vanilla extract. You just whisk it
together in a bowl. Then I'm gonna just drizzle that right over the top of the
bundt cake. If you want to make it super pretty you can garnish with some lemons
or lemon slices but this cake is ready to eat and boy is it tasty. Thanks for
watching! You can find the full written recipe for lemon pound cake in the
video description. Be sure to subscribe, like, and follow and check out the rest
of my videos where you can find hundreds of restaurant-quality recipes you can
easily make at home! See you later!
-------------------------------------------
How To Make An Origami Paper Bed | Easy Paper Crafts | Paper Furniture Crafts | Paper Girl - Duration: 6:09. For more infomation >> How To Make An Origami Paper Bed | Easy Paper Crafts | Paper Furniture Crafts | Paper Girl - Duration: 6:09.
 -------------------------------------------
#paperwindmill how to make a paper windmill (tutorial) paper pinwheel || - Duration: 4:52.
watch more videos
plz subscribe #mangeshtalk
-------------------------------------------
How to Make Edible Cookie Dough - Duration: 5:32.
Hey everyone. It's Sam here from Sugar Spun Run and today I will be showing you how to make edible cookie dough
I know what a lot of you are thinking right now, isn't all cookie dough edible? While I certainly treat it like it is,
and I am always sampling cookie dough. Technically, as most of you probably know, it is not supposed to be eaten raw.
The problem is, raw eggs carry salmonella and recently raw flour has been linked to E. Coli.
To solve this problem and make this edible cookie dough completely safe for eating,
what I have done is, I have cut out the eggs, and we are also going to be heat treating our flour.
Now, lets talk about that flour for a minute.
As you can see here, I already have some heat treated flour. The way to do this is to measure out your flour.
You are going to need 1 and 3/4 cups of all purpose flour.
and evenly spread that over a baking sheet that has been completely lined with parchment paper.
What we will do is pop that in our 350 degree pre-heated oven and cook that for 5 to 7 minutes
Once it's finished cooking, we are going to let it cool completely. Now this flour is still a little warm, because it just came out of the oven.
So I am going to let this cool, and meanwhile, I am going to prepare the rest of our cookie dough.
I am going to be using a stand mixer for today's recipe, but if you don't have one an electric hand mixer will work instead.
So the first thing we are going to need is two sticks, or one cup of unsalted butter, and you want this to be softened to room temperature.
We'll add this to the bowl of our stand mixer.
and we are going to add 1 and 1/2 cups of tightly packed light brown sugar.
1/4 cup of granulated sugar, a half teaspoon of salt,
and one teaspoon of pure vanilla extract.
Now we will use our mixer to stir everything together until it is creamy and well combined.
Alright so this is looking pretty good, so we can add our flour, as long as it has cooled completely.
Now again, if you have any questions on how to heat treat your flour, I did leave thorough instructions in the printable recipe down below.
So I am just going to knock this extra cookie dough off of the paddle, because I am going to need to remove it.
just momentarily so we can sift in our flour. So I just have a standard sifter here.
and what I am going to do is, I am just going to grab this parchment paper to hold the flour.
Careful because we don't want to lose any of that flour while we are doing this.
and we are just going to pour this flour into the sifter.
Now the reason I recommend sifting your flour is because, when it bakes in the oven clumps are going to form.
So you don't want those clumps in your cookie dough, so we are just going to run it through our sifter so those clumps are broken up.
I'm just using this spoon to work and clumps through so we don't lose any of this flour.
See how we have all of these clumps here.
Alright we are going to reattach our paddle here.
Now we are going to mix this together on low speed, because you don't want that flour to go flying everywhere.
So we will just gradually start mixing everything together.
Now I am going to pause to scrape down the sides and bottom of the bowl.
I want to make sure I have all of the flour well combined, and this is actually looking pretty good at this point.
I'm just going to stir it another second or two longer.
One thing I want to note, is that in the printable directions I have included a note that you can add a tablespoon or two tablespoons of milk if necessary.
Now anytime I've made this cookie dough I've never needed to add milk. It always comes out nice and creamy, a pretty good cookie dough consistency.
What I think might be the problem is people are either over measuring their flour, it's really easy to do that if you are scooping your flour.
rather than weighing it using a scale.
or spooning the flour into a measuring cup and leveling it off.
Or if someone is using an electric hand mixer, it might not do as good of a job creaming everything together as it should.
So if you have a problem where it is too stiff and crumbly and not coming together.
You can add just a splash of milk just to get everything to come together nicely.
Alright the final thing we are going to be adding to our cookie dough is 1/2 cup of miniature semi sweet chocolate chips.
or a blend of mini and regular sized chocolate chips.
and you can either stir these in by hand or using a mixer on low speed.
So at this point, our edible cookie dough is finished. I have some notes in the recipe if you want to add some different add-ins.
like peanut butter, or cookies, or sprinkles. You can add any of those that you like.
or any of your favorite add-ins
but now I am just going to scoop this and serve it.
That's all there is to making your own edible cookie dough.
Safe to eat because of our heat treated flour, and the fact that there are no eggs in this.
I think you guys are really going to love this recipe, especially if you are a cookie dough fiend like I am.
If you guys try this one out, please leave me a comment and let me know what you think.
Thank you so much for watching and I'll see you next time.
Hey if you guys loved today's recipe, I would love it if you gave me a thumbs up and please subscribe,
and even hit that notification bell. If you enjoyed this video, here are a few others you might like as well.
-------------------------------------------
How to make a song with a banana - Duration: 0:58.
See Instagram people,
I think I have a good drop
Great start for a new track
But something is missing...
It lacks human touch.
My manager Maud hates bananas.
Bananas are her biggest nightmares, almost a phobia.
"Maud, catch this!"
So I have Maud in my sampler #IamMean
My face when I'm playing some Maud Brooke
My neighbors may wonder what's happening
-------------------------------------------
HOW TO MAKE PLAY DOH PICNIC SANDWICH MEAT FOOD FOR KIDS(Learn Colors With) - Duration: 13:05. For more infomation >> HOW TO MAKE PLAY DOH PICNIC SANDWICH MEAT FOOD FOR KIDS(Learn Colors With) - Duration: 13:05.
 -------------------------------------------
How To Make A Juicy Whole Roast Chicken | Delish Insanely Easy - Duration: 8:39.
- We're roasting chicken.
Nothing beats a perfect roast chicken.
Our recipe is really easy and it's full of
great techniques to make sure your meat is juicy
and your skin is super crispy.
Before we start I will note to en chicken.
In order for chicken's skin to be really crispy
you want as little moisture as possible.
So if you can, take your chicken out of its packaging
the night before,
pat it dry and put it in your fridge, uncovered.
That way the skin will dry out
and when you bake it, it will turn out super crispy,
which is exactly what we want.
When you go in the grocery store
you'll probably see a lot of different information
on your packaging for your chicken.
You should look for,
I wrote it in my notebook.
You should buy it air chilled,
rather than water chilled.
That refers to how the chicken is cooled
after it's slaughtered.
I know, it's kinda gross.
This chicken has been hanging out in the fridge
for a couple hours.
I'm gonna just give it one more pat down,
just to make sure it's completely dry.
It's time for the seasoning.
We've got salts.
And we want to get this salt in every nook and cranny
of this bird,
even the cavity.
The best way to do this is just to hold the bird
with one of your hands,
and salt with the other,
that way you don't contaminate your salts.
A lot of people think you need to wash your chicken
before you bake it.
That is not true.
All that bacteria is gonna die in the oven.
So you don't have to worry about it
contaminating your food
and actually if you're washing your chicken in your sink
you run the risk of moving that bacteria around,
mixing it with the water.
It's gonna hit your counter,
it's gonna hit your sink.
It's just gonna make everything worse.
So I promise it will taste just as good
if not better, because the skin's gonna be crispier,
if you don't wash it.
So don't do it.
Don't wash your chicken, okay.
Please, do it for me.
Thank you.
A little pepper.
We are going to stuff the cavity.
A lot of herbs, citrus, garlic.
I really like to just pop a whole lemon
in the cavity.
The reason I don't cut the lemon is because
as the chicken bakes, the juice from the lemon's
gonna evaporate and it might kind of steam the chicken.
It might affect the crispiness of your skin
so I like to leave it whole.
It adds like a really nice really subtle lemon flavor.
And then in terms of herbs, I just got some thyme here.
Rosemary or tarragon would be delicious.
Don't be shy.
Popping some thyme in here.
And the lemon.
In order for the chicken to cook properly in all parts
we need to truss the bird so it's all compact
and nothing is burnt, nothing is under done.
So we're gonna use some butcher's twine.
About like two feet ish.
I'm five feet,
yeah, that's about two feet, I'd say.
So we're gonna come through at the bottom
of the drumsticks and cross over.
And then we're gonna go under each drumstick like so.
Then we're gonna come around to the back
between the wings,
and at this point I'm gonna flip the bird over.
We're just gonna loop around the neck bone,
pulling somewhat tightly.
And we'll just give it a quick tie.
Give it a bow.
It is a gift after all.
Flipping back over.
Chicken's nice and compact.
And then you can just tuck the wing tips
right under that string.
That way they won't burn.
How about that?
Cute little chicken.
This next step isn't totally necessary
but it's a great way to make this into
more of a meal.
We've got some delicious veggies that I'm going
to line the bottom of our roasting pan with
that will catch all that insanely good chicken fat
while the chicken is roasting.
It's almost as good as the chicken honestly.
You can use whatever vegetables you like.
I am using rainbow carrots,
some onion,
and fennel,
but baby potatoes would be delicious,
turnips would be great
and then I just got a head of garlic that I've halved.
Nestle it in with the rest of my veg.
I happen to have some thyme left over
so might as well throw that in too.
A little salt couldn't hurt.
And maybe a little pepper as well.
Now I'm just gonna fit our roasting pan with a rack.
This will help the heat from the oven circulate
and make sure that your chicken is being
cooked evenly throughout.
If you put it just flat on the baking dish
then there's not gonna be any air coming from the bottom
so it's better to have a little rack
or if you don't have a rack, just really go
hard on the vegetables and make kind of
a natural rack for your chicken.
Just as a final step, also not totally necessary,
but very delicious,
we're gonna brush it in butter.
This will just help with the browning
and just adds a good flavor.
There is my opinion nothing that butter
doesn't improve.
So we're just gonna stick with it.
Make sure I get every bit.
You know if a little butter drips down
onto the veggies,
you know, it's all for the best.
All right, beautiful.
I have an oven preheated to 425,
and we're gonna pop this guy in.
Our chicken was a little small
so it might be done a little faster
than your average chicken,
but usually it will take between 50 minutes to an hour.
But I'll keep checking.
I was just smiling at the chicken.
So it's been one hour
and I wanna check and see if our chicken is done.
Whoo.
A chicken needs to be 165 degrees on the inside
for it to be safe to eat.
I'm gonna stick my instant read thermometer
in between the breast and the drumstick.
At the thickest part of the meat.
Yea.
I'm gonna let this rest for 10 minutes
and then we can cut into it.
("Chicken Dance")
All righty,
so my chicken has rested.
And it's time to cut it open.
To start I took off the twine.
And now we can start getting into the cutting.
I'm gonna start with the legs.
It's juicy in there.
We're just gonna go straight through that joint
and that will give us our drumstick and thigh meat.
So we're just twisting off the wing
because the chicken's really tender,
so you don't even really need a knife for it.
Ta da, cute little wing.
And then last step
is cutting the breast meat off the bone.
So this area right here is called the keel
so there's one like bone right here
that we need to try to avoid.
And we're gonna cut as close to the keel as we can.
And then we're just gonna slowly start cutting
away from that bone so we can get as much of that
breast meat in one piece as possible.
Some people might worry that
if they let their chicken rest
it's gonna get cold.
But this has been resting for like 15 minutes now
and it's still super hot,
so you really don't have to worry about that.
And as for any excess meat that you might not
have gotten completely,
either you can pick it off,
super easy,
super delicious,
and just serve it with the rest of your meat
or if you wanna make a stock with it
it's nice to leave a little bit of it on
you should not throw this carcass away.
It makes the best chicken stock ever.
And flip it over.
And just to show you,
here, right here,
these two bits of meat right here
are called the oyster.
And they're some of the most tender bits of chicken
on the entire bird.
It looks like this.
("Chicken Dance")
I just gotta make sure it tastes
as good as it looks, you know.
Moment of truth.
You get this really slight hint of lemon
that's so good.
You can also taste the thyme
and I think we have to try a veg, too.
Chicken fat,
is truly a miracle.
That is what you want.
Look, can you kind of show,
juicy.
What kind of seasoning do you like to add to your chicken?
Let me know in the comments below.
Không có nhận xét nào:
Đăng nhận xét