Please Subcribe my Channel.
Please Like ,Comment and Share my video.
-------------------------------------------
HOW TO MAKE A SUPER EASY BOW - Duration: 1:57. For more infomation >> HOW TO MAKE A SUPER EASY BOW - Duration: 1:57.
 -------------------------------------------
How to make invisibal name Id on Fb in (2mint) - Duration: 1:31. For more infomation >> How to make invisibal name Id on Fb in (2mint) - Duration: 1:31.
 -------------------------------------------
HAPPY EASTER DAY 🐰🥚 | How To Make Slime For EASTER!!! - Duration: 9:03.
-------------------------------------------
How To Create An Energy Particles Logo Reveal, After Effects Tutorial & Template - Duration: 7:07. For more infomation >> How To Create An Energy Particles Logo Reveal, After Effects Tutorial & Template - Duration: 7:07.
 -------------------------------------------
How to Make Your Own Radio Station | 2018-19 | Easy Method - Duration: 2:06.
How To make your own Radio Station ...
You Must HAVE Winamp of Any Version
First, things First your speed has to be at least 256/64 kbps (which means Dial-up users,
will have alot of latency, just dnt bother)
Second, your going to have to have a domain, an updated one with the current i.p active.
Could be anything e.g.
My sig
Now, Your gonna have to download the Shoutcast Files.
Go to
www.shoutcast.com
to get the files.
Ok After downloading these, installing Both of them in any order i dnt care.
Go to START-PROGRAM FILES-SHOUTcast DNAS-EDIT SHOUTCAST DNS CONFIG.
Ok your gonna have to Configure it: Go Down and where it says password: change
(that means your gonna have to change it to whatever, make sure u remember)
The Portbase: change it to whatever port you want it
Maxusers: (lets be realistic here, dnt put in 10000, like NXS's radio station) your bandwidth
has to be extremely good, if your cable, 50 user max is ok, ADSL should stay below 10
users, and T1 connections should do whatever tickles there fantasy.
EDIT-SAVE.
Open winamp, RIGHT CLICK-OPTIONS-PREFRENCES-DSP EFFECT-and choose the NULLSOFT SHOUTCAST.
Go to OUTPUT, and then click on Connection, Through the ADDRESS, type your address which
you have done through Code:
www.no-ip.com
PORT NUMBER, whatever u did in the EDIT.txt, and your password.
Then go to Encoder, and choose your quality of your music.
Go back to OUTPUT-OUTPUT CONFIG-YELLOW PAGES. this is your advertisemant information.
dow hatever you like there.
Now Connect. to check that your Radio os on-line go to http:// your address that you added
in the prefrence
-------------------------------------------
How to make felt Easter eggs - Duration: 1:43.
How to make felt Easter eggs
-------------------------------------------
DIY How to make an easy wire cat-ring. Easy wire wrapping - Duration: 2:37. For more infomation >> DIY How to make an easy wire cat-ring. Easy wire wrapping - Duration: 2:37.
 -------------------------------------------
How To Make Realistic And Easy Paper Rose (Complete Tutorial) - Duration: 3:44.
How to make realistic and easy PAPER ROSE
-------------------------------------------
How to Create Reusable Content - Editing the Stock Templates - Duration: 18:37.
In this video we're going to show you one
of the most common ways to customize the
Proposal Pack and Wizard software for
people who are writing multiple
proposals. One of the things you do when
you're writing multiple proposals is you
don't want to have to retype the same
material that's consistent across all
your proposals. Such as company
information, your list of services and so
on. So the way we do this is you edit our
stock templates that you're going to be
using for all your proposals. We're going
to illustrate this using one of our
design themes, our Accounting #1
Pack. Now this works with any of our
hundreds of packs for any kind of
proposals. There are four different ways
you can edit our stock templates. We'll
show you all four methods here. The first
is to locate the install folder for your
Proposal Pack. By default they're
installed into a ProposalKit folder
with a subfolder ProposalPack. And then
the design theme name. So, for whatever
package you installed look down the
folder directory structure of your
Proposal Packs until you find a
Documents subfolder and then a Word
subfolder. Now the Excel spreadsheets are
in the Spreadsheets folder. So in the
Word subfolder, once you find this folder
with over a couple thousand templates in
it. These are the stock Word documents
that are assembled together into every
proposal you create. So all four methods
we're going to show you are just
different methods of editing the
templates in this subfolder. So this
first method is the manual way of just
going straight into the subfolder using
your operating system. So we'll show you
how to open one specific template. The
Cover Letter. So we'll just scroll down
all the templates. They are titled by the
names of the actual chapters.
So we'll just go down and find the Cover
Letter.doc. So in the Wizard
interface when you select the Cover
Letter chapter this is the Word document
it's going to assemble into your
document. So we're actually going to edit
this template and save it so you can see
how the edits show up in your assembled
document later. Okay, so we're going to
take this stock template and we've
written some text already. We're just
going to insert it in place.
Now we have an edited Cover Letter
that's going to get used for all of our
proposals. Now we're going to illustrate
this using the idea of an accounting
services proposal. We're going to save this
Cover Letter. Now you'll note we're
saving over the top of the existing
templates. We're not doing a Save As.
We're not changing any file names.
Okay, so we've edited one template
manually. Now we'll show you the second
way which is to use the browser-based
organizer. These are the red icons on
your desktop. It says Open Proposal Pack
and then whatever design theme you have.
Now this time we're going to open up a
different template. We'll open up the
Title Page. So we can either click the
All Editable Templates link here or we
can do these dropdowns.
And we'll just go to the Top 40 Most
Common because that's where we know the
Title Page is. Now once you get to any of
the chapter templates in this organizer
clicking the Open Document button will
basically do the same thing as if we
were in that folder and double-click
the Title Page template. So now we've
opened up another template that's in
that same folder. Let's just say we're
going to always use the Title Page. Okay, so
now we've edited two templates all those
edits will always get pulled into every
proposal created. Okay, now the third way
to get to editing those templates is to
use this Document Styles button. Edit
Style, click this Manage Templates tab
and click the Edit Stock Templates
button. Now this screen gives you access
to all of the thousands of templates. Now
we're going to edit the Services
Provided chapter because we've decided
the services chapter is what we're going
to use for all of our proposals.
In this case now it can be
kind of difficult to find an individual
chapter using these dropdowns.
So we're going to sort these in
alphabetical order to make it easier to
find the Services Provided chapter. So
click this in alphabetical
order and now we want to find the
Services Provided so we'll just go down
to the S's.
Find the Services Provided template and
you'll see a yellow arrow pointing to a
button called Edit Selected Template. All
this did was open the services template
from that documents Word subfolder.
We're going to paste in some text that
we want to use for all of our proposals.
We'll save this template. Okay, so that is
the third way you can edit our stock
templates.
Now the fourth way is when you're
actually in the Document Project screen
selecting templates for your project. So
click the Document Projects button.
Now for all of our proposals we've
decided we're going to use a Cover
Letter, a Title Page, a Back Page, the
Services Provided page, and a Cost
Summary page. These are a
good general set of chapters for most
services proposals. Now you have
thousands of other options to add
additional chapters to flesh out any
kind of services proposal or any type of
proposal. But for this example our base
proposals are always going to be these
five templates. Now because we're going
to use the same set of chapters for all
future proposals we're also going to
create a preset. This way we don't have
to find and reselect all of our
chapters every single time. We'll call
it My Proposal Layout. Create a preset.
And now every time in the future we come
back we'll select this preset. It'll
automatically load our five chapters
and when we built the document it'll
load in all these edited templates we've
been working on as well. Okay now the
fourth way to edit stock templates is
from this screen. The Add Templates tab.
Click the Show all Templates button and
you'll see you have access to the
thousands of chapters from these
dropdowns. Again, we're going to sort this
alphabetically because we want to find
certain chapters a little quicker. Now
also there's another optimization here.
We can click this Only Show Templates
Selected in my Project. That will narrow
these lists down to only the five
chapters we actually have selected in
our project. This makes it much faster to
open templates because now you can see
we can quickly go to the Cost Summary
without having to scan through thousands
of pages in these drop downs. So now
that we've highlighted Cost Summary we
can click the Edit Template button. Now
if you're using the Expert Wizard it's
also going to open an Excel spreadsheet.
For Novice users you'll still have the
spreadsheets available but they won't be
directly linked into your Word
documents. For Expert Wizard users these
cells will actually be linked into your
document if you want. So this
example will show you how to
edit a stock Excel template.
So we've put in some stock line items
and stock prices and will save the Cost
Summary Calculator and will make some
edits to this Cost Summary template.
Now notice we're leaving these tags in
the Cost Summary template. These tags
will be replaced with links to the Excel
spreadsheet for the Expert Wizard users.
For Novice users these will be replaced
with some stock line items and you can
manually edit the cost summaries for
each proposal. Alright, so now we've
edited four templates and all of our
edits will be pulled into every proposal
project we create in the future. So we'll
give this project a title. Call it
Accounting Proposal #1. Our
Company Data is already in here, our
Client Data that'll change for every
client. And now we're going to build this
proposal. Now because we're using the
Excel spreadsheets we're going to link
those into this document just to
illustrate the Expert level feature. Now
we only are going to use four line items
in the spreadsheet so we'll select
4 here just because that's going to
make less manual editing of the Cost
Summary once it's generated by it by not
adding extra lines that we don't need.
Okay, now our documents have been
generated and we'll show the Expert
level feature here with a linked
spreadsheet. So these were our stock line
items we've put in. And you'll see the
text that we had entered into the stock
Cover Letter has been pulled in and the
Client Data and Company Data have been
merged in. And you'll see the linked
Excel spreadsheet line items and prices
have been pulled into the Cost Summary.
Now for Novice users you would just be
manually hand editing this Cost Summary.
But also see our edits to the stock
templates have been pulled in. The edits
we made to the stock services page right
here were pulled in. So every document
we would generate from now on will use the
same set of chapters and the edited text
that we had saved in the stock templates.
And you can keep making changes to the
stock templates as often as you like.
One benefit to having all the stock
templates in separate documents that are
all assembled is it that you can make
even more custom changes to future
proposals. So let's say one of our next
proposals we needed to write was for a
larger project and we needed to add
additional chapters to it beyond the
five stock ones that we commonly use.
We'll just go and add a new project.
We'll go and select
our preset. We'll load our five common
chapters that we use for all of our
proposals. But now let's say we want to
add some additional chapters for this
new proposal. So say we want to add a
Payroll page and a Bookkeeping and Tax
pages.
So we'll add a Bookkeeping, a Payroll,
Taxes and a Reporting page. We're going to
add four new chapters. So now we're up to
nine chapters for the next proposal. So
click OK. Click OK. We'll fill in our
Client Data screen. I will save the
project and we'll build the second
proposal. Now the second proposal will
use the same edits that we had made to
the 5 stock templates. Plus it's going
to pull in four new chapters. Okay, now
our second proposal has been generated
and you'll see again that's pulled in
our stock edits.
But now it's also pulled in a Reporting
chapter, the Bookkeeping chapter, Payroll, and
Tax chapters. So this is how you can more
efficiently create multiple proposals
over time and minimize the amount of
work you're doing by not having to
retype common information that gets used
over and over. Plus the ability to
customize your proposals even more with
additional chapters or changes to the
layout. Click subscribe to keep up on the
latest proposal writing tips with
Proposal Kit.
-------------------------------------------
How to make a star card - home decor - mini book - Duration: 35:00. For more infomation >> How to make a star card - home decor - mini book - Duration: 35:00.
 -------------------------------------------
HACKS YOU NEED TO KNOW TO MAKE YOUR HAIR LONG TO BOB AND HAIRCUT - Duration: 0:56.
please subscribe my channel
-------------------------------------------
كيف تصنع غبى - How to make an idiot - Duration: 3:18.
He is back again
Me
Let's start the video
I'm with the quote that says there is no stupid person
But during his life things happen that turn him into an idiot
And all start with no.1
Education
Today we will learn
How to subtract
This lesson is for
First, second and third grades
How to subtract two or more numbers
as an example
17 -
this pen not working
as example, 17-8
subtracting 8 from 17
the right way to get each number with the one under it
so, 7-8 will not work
7 is less than 8
so i borrow i take the 1 and make it Zero
and i get 17 ?!?!?!?
What ??
Wow Wow, great job really XD
And after the teachers destroy half of his/her brain
His bad friends destroy the rest :D
Hello
Yes
Salam Aleakom
We aleakom el salam, How are you ?
Good, Who?
Congratulation you just won 1 golden pound from Vodafone
Hello ( Her Husband)
Hello, Salam Aleakom
We Aleakom El Salam
Congratulation sir you just won 1 golden pound from Vodafone
Really, good....
Np, can we have your address
Give it to you where ?
Give me the address
Give to you where ?
What you mean ?
Give to you where sweetie :D
To write it down
and if you want the address you son of an idiot, Why are using a competitive company's number you idiot, son of idiot
Idiot
Do you think a human that educated this way
and friended people like those what will he be ?
Sure he will be Abdo El Hengel ( Name )
Didnt i told you, i dont like this way of joking
Surrender
Surrender, get away from me
I can fight all day, i'm not scared
You are lucky i'm not so good with knives, arent any stones here?
Go away boy
Not Abdo El Hengel, Not Abdo El Hengel who get scared from a Knife
Go away
I dont wanna hurt you
Fight me man vs man
There go the knife
Listeeeeeeeen
Stop it
I'm not craaaaaaazy
Doctor please
Please dont call me Crazy
So a tip to everyone, take care and dont be Abdo El Hengel
And if you liked the video, click like
Subscribe form here
And the to watch the previous episode from there
And from the next episode we try something new hope you will like it
See you next time
Salam
Listeeeeeeeeen, Stop it
-------------------------------------------
How to make glitter eggs. Easter craft idea for kids. - Duration: 1:35.
How to make glitter eggs. Easter craft idea for kids.
-------------------------------------------
✓Minecraft: How to Make a Hopper Clock (MCPE, Creative Mode) - Duration: 3:08.
Hello! I'll be making a hopper clock today. Wanna know how? Then let's crack on with it!
First, you'll need: Two hoppers; A lever (optional) ; A comparator; a repeater; any old item; and your redstone circuit.
I'll be doing a piston circuit.
First, you place a hopper facing Down, then you double tap the Jump icon and hold the Down arrow. While you are holding it, place a hopper facing into the other hopper, then destroy the first one and make that hopper face into the 2nd hopper.
Then, you run a comparator output out of 1 hopper.
Then, you place a repeater following it.
Then, make your good ol' redstone circuit.
Then, if you have the lever, go into Fly mode, hold the down button, and place a lever on the hopper without the output. Leave it off.
Then, chuck any old item in 1 of the hoppers, and the hopper clock should work! Flick the lever to turn it off.
-------------------------------------------
How to make Sabut Dane ki khichdi - Duration: 4:06.
Hello friends, how are you all
WELCOME TO NISHA'S NAMAK SHAMAK CHANNEL
Today I will make Tapigo Sago Khichdi
Ingredients Required for Tapigo Sago khichdi are:
Tapigo Sago
Soak Tapigo Sago in water for few hours and then throw the excessive water
One chopped tomato
One boiled chopped potato
Chopped Coriander
Peanuts
Black Pepper Salt
Salt
Chopped Ginger and Green chilli
Add Oil to Roast peanuts
Add Peanuts
Take out the Roasted peanuts to a bowl
Take out the excessive oil
Add chopped green chillies and ginger
Add chopped boiled potatoes
Add chopped tomatoes
Leave the mixture to fry properly
Mixture is ready
Add Salt to the mixture
Add black pepper salt
Add Roasted peanuts
Add Tapigo Sago to the mixture
Mix it properly
Leave the Mixture for 2 minutes
Tapigo Sago Khichdi is Ready
Add Coriander
Mix it again
Turn off the gas
Pour the Tapigo Sago khichdi to a bowl
Garnish it with coriander
Tapigo Sago KHichdi is Ready
DONT FORGET TO LIKE, SHARE AND SUBSCRIBE MY CHANNEL
-------------------------------------------
How to make dessert ice cream - Duration: 5:42.
today i'm going to make desert ice cream
first we need apple
we should add some ice cream
and we can add some honey
then we need some peanuts and nuts
then we will add apple
then we should add some saffron
now ice cream dessert is ready for eat
-------------------------------------------
How to Make a 3D Paper Xmas Tree DIY Tutorial-Very Easy and Beautiful Christmas Tree-Easy Paper Tree - Duration: 3:42.
Welcome to origami art channel. Today i show you how
to make Christmas tree ideas. Xmas tree make very
easy and simple. You can make tree easily.
If you learn please watch full video and
follow step by step instruction.
Don't forget to Subscribe, like, comment and share if you like this video.
Thank you very much for watching this video.
-------------------------------------------
[Arduino Robot] How to make a Motion Capture Robot | Thumbs Robot | Servo Motor | Source Code - Duration: 8:29.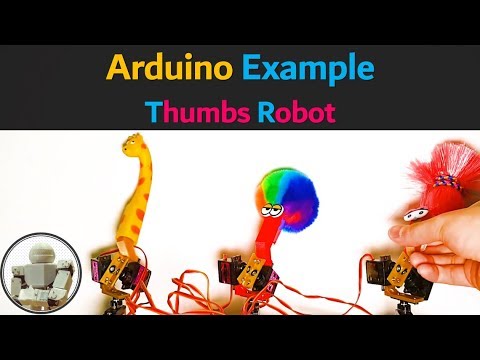
let's make it together first of all you need to prepare all parts
okay let's begin.
first of all we need to download the source code file from github.
as you can see there is a zip file. extract all file and double click the source code file
if you didn't install the arduino IDE yet please visit the link and install it.
select Arduino nano and select ATmega 328 (old version bootloader)
and plug the USB cable and a new port will appear
Click the appeared port and hit the upload button
I uploaded 3d files on Thingiverse
you can download the files for free and the link is in the below description
I'm gonna show you how to modify a servo motor into position sensor
basically most servo motors have a potentiometer or encoder
for getting an angle value
I'm gonna use the potentiometer
in order to use it
we need to open the case, disassemble the board and rewire like this video
I'm in the middle of disassembling and reassembling the gears
I got rid of the third gear
Cut the wires which are connected with the motors
now I'm using a soldering tool and detaching the board
from the potentiometer
cut a wire and prepare for soldering
and put some paste and put some lead on the cable
from the very left side red yellow and brown
please make sure the direction
and I put some glue on it
we are going to do the same work for two other motors
now let's make the joint
all you have to be careful is the location which will be connected with the Arduino
just follow this video
by the way all the list is in the below description
and you will need to buy some parts and some tools
the three motors on the left side are original motors
And motors on the right side are modified
be careful not to get hurt when you assemble the parts because they are sharp
here is one of most important step
put the horn on the motors and check the available angle
as you can see the angle is limited
so I put the horn like this
detach the horn and put the horn again
and check the available angle
keep in mind that the angular ranges of the motors must be the same.
let's assemble the joint roughly since we may adjust the later
looks good
assembly the arduino nano and the expansion board
the right motors will be plugged into analog pins
the motor(potentiometor) at the bottom is plugged into A0
on the other hand the left motors will be plugged into digital pins
the motors at the bottom is plugged into pin 9
the second motors are assembled this way
once again the left motors are the original motors and the right motors
are the motors that have been modified for potentiometers
the second motor is on pin 10 and the second potentiometer plugs into pin A1
if we plug it in the wrong direction it could burn the board in the worst case
please please make sure the direction
let's make a joint connecting the second motor and third motor
I will assemble the joint
assemble them so that operating angle of both side are the same.
turn it manually until the motor does not turn
if it does not go any further turn it 90 degrees backward
and disassemble the horn and put it together again
based on that location
again I'm gonna assemble roughly
to make it easy to adjust later
let's assemble the third motor
plug the third motor to pin 11
plug the third potentiometer into the A2
assemble the last part one by one
put the USB cable into any power source and test it
oh it looks good
it works well!
I wanted one more robot so I made one more
with the Arduino Nano you can build and control maximum three robots
if you wanna make more than three units
you must use another board
the third robot will be connected with 3,5 and 6
if you want to see more projects please subscribe if we have any questions
please leave comment below I'm Euchan Park
thanks for watching see you next video
-------------------------------------------
How to Create Marbled Easter Eggs | Sophie's World - Duration: 6:07.
hi I'm Sophie and welcome to my world well with Easter right around the corner
I thought it'd be fun to do a new egg dyeing technique and this is an awesome
one it uses shaving cream hard-boiled eggs and food coloring and you end up
with this totally cool swirly whirly tie-dyed egg so I'm gonna teach you how
to make one right now for this project you're going to need
shaving cream neon or regular food coloring plastic spoon hard-boiled eggs
a plate or pan or tray that has a lip paper towels and a safe work surface
gloves are optional first thing we're gonna do is you're gonna make sure that
you have your hard-boiled eggs ready to go and if you don't know how to make
hard-boiled eggs there's a link down below that shows you how to do it I'm
gonna be using this as my work surface but this is the perfect tray if you were
gonna do a lot of eggs but since I'm only gonna be doing one or two right now
I'm gonna just use this little plate here that has a nice lip and
that's got a that's got a lip that gives us about an inch and a half which is
what you want and here you can see you can use a cookie sheet or you can use a
tray like this one if you're gonna do a lot of these so make sure you have your
hard-boiled eggs already done mine are done right here
and put those off to the side here and shake up your shaving cream and put the
shaving cream in your plate then use your spoon to spread it all around now I
have been told that you can do this with cool whip but I've never tried it it
seems a little sticky and sweet to me so spread out your shaving cream so it's
nice and smooth kind of like a whipped cream pie there
and then you're going to take your neon food coloring now I want to show you
something this is using neon food coloring and
this is using regular food coloring so you can see the difference between the
two the neon is a lot more vibrant you're just gonna take your
drops of food coloring and just kind of drop them willy-nilly on your shaving
cream this is the fun part now take your spoon and gently swoosh it up and down
and kind of mix those colors together so you're making kind of these really neat
patterns and shapes very tie-dye or marbleized
then once you've got it to a point that you like take your hard-boiled egg and
this is where you might want to have gloves and as you can see I've been
using it without gloves and you'll see what happens to my fingers just roll
your egg and make sure you coat it on all sides and then place it on paper
towel and you can roll a bunch of eggs
and just lay them down and lay it down now we're going to let those rest for
like thirty minutes so I actually have some that I did earlier these have been
resting actually more than 30 minutes but you're going to then place them
under the tap so you turn your kitchen faucet on and place them underneath it
and let the water run on them but because I can't do that right now I'm
just going to put them into a little water bath right here and you can see
all that shaving cream comes off and you're left with this really cool
tie-dyed egg isn't that neat I'll show you another one and they all
look different that's what's really cool about it
depending on what colors they picked up like that one has a little yellow you
can see the swirly effect now once you're done with your shaving cream and
you got that lid you can do something really cute which is make a little
basket and then you can put your little egg in put my dry one in there you have
it your tie-dyed Easter eggs and listen when you're all done with that shaving
cream you can turn the top into a little Easter basket
all I did was take my top add some cute little washi tape around there glue two
ribbon on inside and added some stickers from Easter and you make a cute little
basket out of the top for more great ideas for recycled and for Easter check
us out at sophie-world.com
Không có nhận xét nào:
Đăng nhận xét