How To Make A Mini Washer With Cardboard, Great Creative Idea With Cardboard
-------------------------------------------
How to Create Subtitles and Closed Captions on Your Youtube Videos - Duration: 9:09.
hey in this video I'm gonna show you how to add captions to your YouTube videos
and there's a couple different reasons for actually adding these captions and
one of the best reasons is because allowing the like written content we
placed inside of your video is gonna allow Google's algorithm to better
search your videos and rank you a little bit higher because when you actually
input these captions you're doing a better job than the AI is when it comes
to recognizing your voice and taking that and turning it into written words
Google is based on different algorithms that search and Google owns
YouTube so what happens is the more information that you give to the
algorithm, the AI, the better it's gonna be for ranking your stuff and getting
you more views and more rankings and there's actually something I'm going to
give you a $10 off coupon for the service that I use and I'm gonna show
you how easy it is to actually use this so as you'll see here I have a bunch of
orders that I haven't uploaded yet okay so right now I'm going to show you I
have one video what a speed of implementation and how can you leverage
it so this is what Rev did for me that went through and you know made all of
the appropriate written words and all that so I'm gonna go to download and I
usually do plain text and I don't include the speaker names because it's
me talking so after that we're gonna look for street depending fomentation
video so this is my channel if you haven't subscribed yet go ahead and do
that where is the speed of implementations right here so I'm gonna
click on the video and then I'm going to go to edit video and inside of this area
here there's the subtitles up at the top right subtitles/cc and all you need to
do is click on add new subtitles or CC and then I have English in my videos so
I select English and then there's select a method so if you don't want to have
the service that I use you and do-it-yourself by clicking create
new subtitles or CC the way that I do it saves me a ton of times I just upload a
file and then this is that file that we downloaded before so we'll see here
upload a file will overwrite so what I'm going to do transcript choose the file
go to my downloads and click that and click on open and then we'll upload and
what we'll do next is it'll fill in here and what you want to do is make sure you
hit set timings and what this will do this is gonna take a little while
because it needs to go through and partner up the words with the time that
it actually takes place in the video you'll see here it's still setting
timings so you might need to you know go get a drink of water or take a little
break from work for a minute while this does it and what I usually do during
this time period is I'll go to my website and I will create a blog post
out of this post or out of this video so we'll go to posts and this is something
that I do recommend doing because it is a easy way to get more backlinks to your
content so that you'll rank higher let's see this will go to this is just basic
WordPress okay so what is speed of implementation will open this will copy
that and paste it in here and the biggest thing to do with this is you can
see it's like really chunked so I always go in and I'll make like you know
basically break it up so it's easier to read and because this is just a simple
example I'm not gonna go through and do what I normally do which is read through
this or you can even have somebody read through this and make sure that it's
easy to chunk like sentences and stuff let's see so once you're done
so this I actually give people a challenge you
see here like I'll subscribe to your channel if I give people a challenge
where if they actually create a video from what if what I taught the video
then I'll subscribe to them but go to text and will actually click on this
video to get the embed code and the title okay so we'll copy this and as you
can see this is just you know pretty easy process to do if you're willing to
put in the time or have somebody do it for you then go to share and embed and I
usually take these off show player controls leave those on select that and
then I'll copy that put that into the blog post and it doesn't really matter
where you put it like you can put it at the top or at the bottom pation and you
can do some basic SEO stuff I don't want to get into all of that now but like I
guess even within here if you just link up to other posts you've done so you're
creating like a web for your content it'll help out with SEO stuff as well
but after that I'm not going to show you all the process because I still have to
do a bunch of other stuff within this post but we'll go back to the video and
refresh to see if it's set up and ready
okay so it still says the subtitle timings are being set check back soon so
that's gonna go through and actually plug these in for me and you'll see that
I already duplicated that process that that content and you're giving yourself
a backlink by doing this so rev really is one of the easiest ways to get this
content created all you've got to do is upload the link to your YouTube video in
order for it to work actually I'll show you how to do that as well just so you
can use this service if you'd like to let's go to a related video of mine if
you haven't subscribed do that like I mentioned earlier okay so I don't think
I have one for this I just uploaded it so I'll copy the address and then go to
my files you can go to place new order transcriptions caption subtitles
translations you can pretty much select any of these you can do a captions and
you'll see that I did copy that youtube link so what I can do is pull videos
directly from your account this the - synced up so I can just click that and
then we'll click only show files only show videos without a caption file and I
guess you can see it'll pull the videos and that's the one I'm uploading right
now but stuff I said confident leverage okay so I put up a couple videos
yesterday go to this one and then add selected to
cart you'll see here 7 at 7 bucks so it's a dollar a minute which is in my
opinion it's really good because it takes me like 4 to 5 minutes per minute
to go through and like handwrite typing everything out but after you do that all
you got to do is check out so like I mentioned at the beginning if you want
$10 off your first order there's going to be a link in the description that's
going to give that to you using that link we'll put that $10 in
your in your account so I gotta do is click the link and then fill in this
first name last name email how did you hear about us and put Chris Hughes and
then it'll give you your promo code and you can see here pricing a dollar per
minute turn around 24 hours accuracy 99 percent more than a hundred thousand
customers and twenty thousand transcriptionists it's a weird word but
based in the US you're getting high quality people doing this work for you
but thank you so much for your time be sure to subscribe to my channel if you
haven't yet and click on the link down below to get the $10 off your first
order of transcriptions on Reve thanks and I'll see you in the next video
-------------------------------------------
DIY How to make kanzashi ribbon flower (ENG Subtitles) - Speed up #516 - Duration: 2:49.
Hi. Today I will show you how to make flower out of ribbon.
Detailed list of all needed items is in the description of this video.
Cut a strip out of ribbon (1.2cm x 10cm).
Fold it in a half. Glossy side out.
Cut off a corner,..
...burn the edge...
...and press it.
Place one end on another,..
burn the edge and press it.
We need 6 petals such as this one.
Cut longer strip of ribbon (1.2cm x 12cm) and made the petals in the same way.
We need 12 longer petals.
Cut a circle out of felt (about 3cm of diameter).
Glue 6 long petals to the circle.
Add another 6 long petals. Glue them between the previous petals.
Make the last row out of 6 shorter petals.
Finally, glue a big decorative button to the center of flower.
And it's done.
This flower is another example of a beautiful things you can create out of piece of ribbon.
You can use to it make a brooch or a hair decoration.
Please give a like to this video and subscribe to my channel.
Thanks for watching. Bye bye.
-------------------------------------------
Paper Flowers | How To Make Rose Flowers With Color Papers | Paper Girl - Duration: 4:06.
Paper Flowers
-------------------------------------------
How To Make An Adjustable Hole Cutter - Duration: 8:15.
Generally when we want to put a hole in timber any bigger than the drill bits
that we have, we can often be relegated to drill multiple holes, filing the mess
that ensues, or we can buy a whole saw which can retail anywhere upward from
$30, we might be able to find something cheap if we're lucky, but sometimes this
is not an option, this is how I make an adjustable hole cutter.
This is Cosador, Johnathan here. So, I want to make an adjustable hole cutter. There's probably
a few ways that I can do this, but I'm going to look at it like I only have a
drill, some bits, some basic hand tools, and an extremely tight budget.
For the materials, I'm going to limit myself to 20 mm by 20 mm square
steel tube, some 10 mm threaded rod, some nuts and some washers.
For this, I'll need to make a plan. For each of the cutter blades,
I'll make them out of threaded rod, which will be 50 mm long, with the
cutting depth of 15 mm and with the cutting width of approximately 3 mm
I want to be able to make two different diameter holes one 92mm
and one 75 mm, so I need to figure out where the hole is for
each of the cutter blades on the square steel tube, and for the 92 millimeter hole
I calculate 92mm minus 2 halves of the cutter blade width, which
leaves 89 mm, so the distance from the center is 89 mm
divided by 2, which equals 44.5 mm and for the 75 mm
hole, that's 75 mm minus 2 halves of the cutter blade width, which
leaves 72 mm, so the distance from the center is 72 mm
divided by 2 equals 36 mm. I need some structure for both of the
cutter blades, so I'll add 15 mm on each side, making the total length 119mm.
So ,119 mm divided by 2 equals 59.5 mm,
which will be my center point. To do this I'm going to need some tools,
a square, a rule, some files, some clamps, a hacksaw, a couple of spanners and a drill
and some bits. Before marking the square steel tube, I can see a seam on one side
of it and I want to avoid any of my holes going through that side because
the bolts will not see properly, I mark 59.5 mm which
is my center point, and at 119 mm, then I use a
square and I mark all the way around the square steel tube, I make two marks on
either side of the center point at 44.5 mm, I draw a
line with the square on each of those marks and I turn it over, I make
another two marks on either side at the center point at 36 mm
and I also draw lines with the square, and I double-check all of my measurements.
Then, I mark the center of the square steel tube where intersects the lines
and I rule a line across all of those marks.
Now it's time to drill some 2 mm pilot holes to guide the larger drill bit,
to stop my drill bit from wandering around the place,
I drill a hole in some scrap as a guide for my drill bit,
I clamp the guide over the crosshairs that I've made.
If I was to have trouble seeing the lines of the crosshair, I can make more precise lines
with a scribe or or a sharpened up nail.
Then I drill all six pilot holes.
Now, I change to the 10 mm bit, I use the drop of oil and I drill all three
holes on this side, and I clean up any mess with a file, and I repeat for the other side.
Now it's likely that the holes that I drilled for the center are
now going to be perfect and might not meet up well, so I keep the best of the
two and I make the other larger with a drill bit or a file, I need to clean up
on the inside of the square steel tube, there's quite a bit of swarf and rough
bits, so I clean it up with a small file. Now, it's time to start work on the
cutting blades, the nuts that need to go on the inside of the square steel tube are
quite a good fit, however I'm concerned that the seam on the side if I make the
bolt not seat properly, so I file one edge of the nut
so it fits nicely and I make three of these. I cut off two 50 mm lengths
of threaded rod with a hacksaw and I take off any sharp edges with a file
Now, I need to do a partial assembly so that I can sharpen the cutter blades,
I put the nuts into the square steel tube now make sure that the filed portion is
correctly positioned, then I screw in the threaded rod approximately 16 mm
leaving some room internally for adjustment, I lock it off with a
washer and nut and I repeat for the other side, I clamp it vertically and I
file off 3 to 3.5 mm, trying to keep the file as horizontal as possible,
I rotate the threaded rod 180 degrees and I do the same for the other side.
Once it's filed to measure, I rotate it 90 degrees and I file the face side
just enough so that it's flat, but no more than the depth of the thread, then I
file the end so the face side is longer than the threaded back side, I repeat the
same for the other threaded rod and the cutting blades are done.
For the last bit of filing, I need to look at the shank of the hole cutter. I have 115 mm
left after I cut the other pieces off, which is roughly what I need, but the
threaded rod is quite smooth rotationally and the chuck on my drill is not knurled and
the shank might slip if I attempted to use it as is, so I will make three equal
marks on the threaded rod and file the thread flat 40 mm on each of
the marks on each side. This doesn't need to be very precise, but it does need to be there.
Now that everything is filed, it's time to cut the square steel tube
down to size for the hacksaw, I tidy it up with a file, I disassembled and I
spray a little paint on the frame of the hole cutter, then with a marker I write
down the hole size on either side. Now it's time for assembly, first I want to
put in the internal nut and screw in the shank until it's roughly about halfway,
then I want to put a washer and nut and tighten against the internal nut, then I
lock it off from the other side of the square steel tube with another washer
nut. To install the cutting blades, first I install the internal nut and
screw in the cutting blade, and lock it off with a washer and nut, at the same
time making sure that the cutting blade is angled correctly, then I do the same
for the other cutting blade and the hole cutter is done.
Okay let's test this out, I'm going to need a guide hole for the hole cutter I'm using a 10 mm
bit and I drill a hole through the MDF sheet, then I mount the hole cutter into
the drill and I put the guide part of the shank into the guide hole, I firmly
hold the drill and I start to make the hole, because the blade has a shallow cut
I rotate the sheet and I continue from the other side and success the 75 mm
hole is made. This hole cutter is also configured for 92 mm
holes and I should probably test that too, so I put the cutting blades on the
92 millimeter side and I cut another hole and it's done.
Evaluating this, both holes were to size but there were a little bit messier than what I really
would have liked and that was probably down to the low number of cutting blades
and how shallow the cutting depth was, while the holes do need to be cleaned up
with some sandpaper, they are mostly accurate and the tool
has done its job.
Sometimes when we have tasks, our lack of tools can be
frustrating and it can make it seem like the job is impossible, so it's important
to be creative, and if this was useful to you please like and subscribe,
I really appreciate every single one of my subscribers, and if you would like me
to do something else, just let me know in the comments, and remember guys
Break it til you make it!
and I'll see you next time
-------------------------------------------
How to make a DIY proximity sensor + Facts about IR - Duration: 6:01. For more infomation >> How to make a DIY proximity sensor + Facts about IR - Duration: 6:01.
 -------------------------------------------
How To Make Coffee - Duration: 1:05. For more infomation >> How To Make Coffee - Duration: 1:05.
 -------------------------------------------
Paper Airplanes That Fly Far | Origami Plane Make very Easy - Diy - Paper Crafts - Duration: 2:57.
Welcome to origami art. Today i show you how to make
paper airplane. Make world record best paper plane
very easy tutorial. Please watch full video and make
best paper airplane for your kids.
Don't forget to like, comment and share if you like this video.
Thank you very much for watching this video.
-------------------------------------------
How to Make Money from Home with Affiliate Marketing - Duration: 1:17.
What if you could make money doing something you love from anywhere that you had an internet connection
Sound too good to be true. It's not we want to show you how with this easy-to-follow beginner's guide to making money online
Now you may be thinking I don't have any programming or coding skills. This can't be for me
not true
Whether you're brand new to internet marketing or a seasoned veteran
this step-by-step
Blueprint will show you how to make money online using only your internet connection
Trying to learn the ins and outs of internet marketing on your own
Is like trying to put together a ten thousand piece puzzle with no picture. It's virtually impossible
It's more than probable that you'll just get frustrated and quit
But what if we told you we've already done the puzzle for you, and we want to give you the last couple pieces
so if you're ready to join thousands of others who are already making money online and
Have access to an experienced coach to guide you every step of the way
Click one of the links that are showing on screen now and take the first step towards skyrocketing your internet marketing journey
-------------------------------------------
How to make a paper bed?Origami Bed l How to make a Doll House Bed with Bedding & Pillow l Furniture - Duration: 8:10. For more infomation >> How to make a paper bed?Origami Bed l How to make a Doll House Bed with Bedding & Pillow l Furniture - Duration: 8:10.
 -------------------------------------------
You don't need a single drop of mayo to make your best potato salad - Duration: 6:48.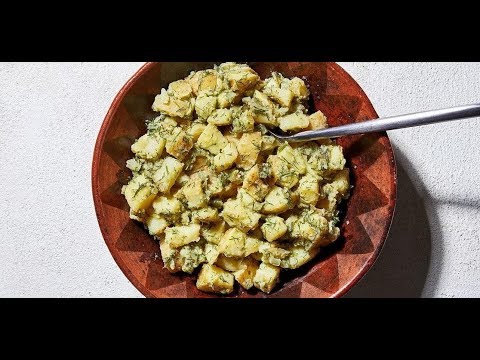
Overview Ingredients Steps Overview There are plenty of things I would like to tell my younger self if I could dial her up and share my wisdom
Sure there were some — okay, a lot of — unfortunate wardrobe decisions, but, really, most of my tips would be about food
At the top of the list: Potato salad is wonderful. See, I grew up exposed to mayo-based salads, where everything took on a sticky white slime that was immediately off-putting
While I've overcome an absolute mayo aversion, even now I prefer not to have my potato salad drowning in the stuff
[Dinner in Minutes: Lentil Salad With Roasted Potato Wedges] I only started to come around to potato salad once my family began to regularly eat at a local barbecue joint, where I became hooked on a zippy mustard version
And that is the type I'm presenting to you. Dressed with a honey mustard vinaigrette, it is tangy and a little bit sweet with plenty of punch that keeps the salad light and bright
Mark Bittman's original recipe called for parsley and scallions, but even hard-earned time and wisdom has yet to win me over to the former
Instead, I decided to channel another food I loathed as a kid but now love: pickles
A handful of finely chopped small pickles, such as cornichons, and an equal amount of dill proved the perfect counterpoint/complement to the vinaigrette
I ended up spiking the vinaigrette with the pickle brine, which is not just a clever way to use something that might otherwise get thrown out
It also added a less harsh, more well-rounded salty-sweet flavor that was lacking the first time I made the dressing with only wine vinegar
I'm calling for Yukon Gold potatoes, which are my go-to potato. Not as starchy as Russet or as waxy as reds, they are a good all-purpose option, with a firm enough structure to hold together in potato salad while still boasting a creamy texture
Plus, their color and rich flavor are ideal in this dish. If you can't find or don't want Yukon Gold, I would lean toward something waxier such as red or fingerlings that will not fall apart when boiled and tossed
[How to leave those bottled dressings behind and make your own vinaigrette] Make Ahead: The potato salad tastes even better after a day's refrigeration
You will have some mustard vinaigrette left over, which is great on salads and can be refrigerated for a few days (whisk briefly if it has separated)
Ingredients FOR THE VINAIGRETTE 1⁄2cupextra-virgin olive oil 2tablespoonsbrine from a jar of cornichons, gherkins or other small pickles, plus more as needed 1tablespoonwhite or red wine vinegar, plus more as needed 1heaping teaspoon mustard, such as Dijon 1 to 2 tablespoons honey Kosher salt Freshly ground black pepper FOR THE SALAD 1 1⁄2poundsskin-on Yukon Gold or other yellow-fleshed potatoes, scrubbed and cut into bite-size pieces (see headnote) Kosher salt 8cornichons, gherkins or other small pickles, finely chopped (about 1/2 cup) 1⁄2cupminced fresh dill Freshly ground black pepper Steps Step 1 For the vinaigrette: Combine the oil, pickle brine, vinegar, mustard and 1 tablespoon of the honey in a blender, mini food processor or in a lidded jar you can shake
Season lightly with salt and pepper. Blend or seal and shake to form a creamy, emulsified vinaigrette
This should take a minute or less. Taste and add more brine, vinegar or honey, a teaspoon or two at a time, as needed
The yield is 3/4 cup. Did you make this recipe? Take a photo and tag us on Instagram with #eatvoraciously
Step 2 For the salad: Put the potatoes in a pot with just enough water to cover them
Bring to a boil over medium-high heat, add a large pinch of salt and then reduce the heat to medium or medium-low, so the water bubbles gently
Cook for about 15 minutes, until tender but still somewhat firm. Drain, rinse under cool water for a minute, then drain again
Step 3 Toss the still-warm potatoes with the chopped cornichons and dill in a large bowl
Stir in 1/2 cup of the vinaigrette; let the salad sit for a few minutes, then taste
Add more of the vinaigrette and season with salt and pepper, until you are happy with the flavor
Serve right away, or cover and refrigerate for at least 1 hour (to chill thoroughly) and up to 2 days
Adapted from "How to Cook Everything," by Mark Bittman (Houghton Mifflin Harcourt, 2008), as posted on MarkBittman
com. Tested by Becky Krystal; email questions to voraciously@washpost.com. Scale and get a printer-friendly version of the recipe here
Did you make this recipe? Take a photo and tag us on Instagram with #eatvoraciously
Nutrition Calories: 290; Total Fat: 19 g; Saturated Fat: 3 g; Cholesterol: 0 mg; Sodium: 460 mg; Carbohydrates: 31 g; Dietary Fiber: 4 g; Sugars: 2 g; Protein: 4 g
-------------------------------------------
How to make Purple Pink Leaves without Photoshop YouTube Creator Studio Journal August 25,2018 - Duration: 4:11.
hi guys okay this is an experiment and I'm here by my bush I trimmed back some
of my stuff today we've got purple leaves we've got purple leaves what do
you think why are the leaves purple what do you guys think the leaves are purple
oh we've got a black light it actually doesn't look like a black light but I
got it to look at the spider right here see how he illuminates I'm gonna bring
this out at night to illuminate so I'm gonna do an experiment in a few hours I
had another bulb but I lost it go figure how that happens but I lost it so see
how it illuminates and then there was one over here there's a spiderweb over
here too but look how the leaves illuminate just so supple look at that
this is during the day they illuminate purple
look at that now these are damaged but then I put it in really close and they
turn purple so I can actually make purple leaves during the day
I don't need Photoshop I can just do it with a black light during the day oh
look at that they turn pink isn't that cool
they turn pink oh that's cool
so I'm just out here I'm just playing around with the blacklight it should be
called a purple light though but I know that oh that's so weird that is so weird
they turned completely purple and I can just do it with my mobile device that's
all I'm using as my mobile device see and I'm gonna put that this is going to
be a journal into my youtube creator studio on my crochet knit channel into
my under that channel because I feel like putting it on there so it's how to
turn green leaves purple with a black light that is cool like they're purple
and green right there so all you need is like a five dollar clamp light from the
Home Depot and then the light itself cost $14 but I think it's worth it it's
an LED light - so LED is supposed to be a better type of a light and I didn't
actually when you look at it I'm gonna cut it off here and show you guys I
asked the lady I said now can I bring it back if it doesn't work if it doesn't do
what I think it should do and she says yes because when you look at it so they
call it a backlight but it's actually a white bulb but then of course when you
turn it on look what happens oh well it's so pretty
you see see that
and so I can illuminate the spider to see how the eye illuminated the spider I
don't want to disturb him too much because I want to come out here at night
and take a picture of the web it was so pretty yesterday the web was so pretty
this one he came back he is illuminated too they're probably poisonous but
anyway oh there's babies there's babies see the babies are hatching
yeah there's little babies in there no wonder i swell i probably getting bit by
poisonous spiders every day so anyway that's it i just wanted to show you how
to turn your green leaves purple and pink purple and pink this is kind of fun
actually oh we can turn the branch purple too
okay
-------------------------------------------
How to make fluffy slime! (Read desription) - Duration: 2:24.
glue
shaving cream
baking soda
contact lens solution
-------------------------------------------
How To Make Kitkat Chocolate Cake Decorating - Amazing Chocolate Cakes Decoration Videos 2018 - Duration: 12:22.
How To Make Chocolate Cake Decorating Videos
-------------------------------------------
How to Make Your Own Spicy Condiments || A Little Help: Hot Stuff - Duration: 4:30.
- Sambals, sriracha, red paper,
(record scratch) red paper flakes.
That's when you just rip up red paper and you put it on.
Not very good. (laughs)
(upbeat music)
Hello and welcome to A Little Help.
It's me, Lee Kalpakis, and today we're talking hot stuff.
Humans have used chili peppers
and hot spices in food (kettle whistles)
for thousands of years, all over the world.
And guess what? It's all delicious.
Aside from adding a ton of flavor to pretty much anything,
condiments made with hot peppers have
vitamin C, vitamin A, antioxidants,
and can even help relieve inflammation.
And they're tasty. - Gee!
- It's way easier than you think
to make some spicy, staple condiments found across cultures
and today we're showing you how to make our top three.
Hot sauce, chili oil, and crushed red pepper flakes.
While all readily available for purchase
at your local grocery store,
making them at home definitely makes
for a much more flavorful result.
We're starting with the old standby,
the stuff that crowds my refrigerator
the stuff that Beyonce keeps in her purse, hot sauce.
Tabasco is the earliest recognizable brand
of hot sauce manufactured in the US beginning in 1868.
So, this stuff has been around
for a really long time and much like Tabasco,
the stuff we're making today is a super simple recipe.
The most basic recipes for hot sauce call
for just three ingredients.
Chili peppers, salt, and vinegar.
Which encourages fermentation
and acts as a natural preservative.
We're gonna combine one pound of jalapeños,
a few habaneros for extra spice,
and two tablespoons of salt.
Put everything in the bowl of a food processor
and combine it until it makes a coarse paste.
(food processor grinding)
(hi-hats crashing)
Paste. (ding)
Then transfer the paste to a quart-sized jar,
screw on the lid, then unscrew slightly.
Allow it to stand at room temperature
for about 12 hours to ferment slightly.
Stir in vinegar, then screw on the lid,
unscrew slightly, and let the chili mixture stand
at room temperature at least one day or up to seven days.
The longer it sits, the deeper the flavor.
Puree mixture in a blender or food processor
and then strain it through a fine mesh sieve
into a clean class jar or bottle.
It will thin and may separate after you strain it,
but that's okay, just shake it vigorously before using.
Keep refrigerated for up to four months.
Next up, we have chili oil
which is a super popular condiment in China.
It's made from infusing vegetable oil with chili peppers
and sometimes you throw some other stuff in there.
It's particularly popular in Szechuan cooking,
both as an ingredient in cooking and as a condiment.
Personally, I dump it on everything.
In a small saucepan, heat the oil, star anise,
cinnamon, bay leaves, and peppercorns over medium heat.
When the oil reaches 225 degrees, allow the mixture to cook.
Adjusting heat as necessary to keep the oil
between 225 and 250 degrees for about 30 minutes.
Stir together crushed pepper flakes and salt
in a medium, heat proof bowl.
Pour infused oil through a fine, mesh sieve
over the pepper flakes and discard the aromatics.
Stir to combine, allow to cool completely,
then transfer it to a jar.
Chili oil will keep refrigerated for up to six months.
Last we have crushed pepper flakes,
a staple of pizza parlors everywhere.
Consist of dry and crushed chili peppers.
Usually there's a high ratio of seeds,
which gives it the most spice.
Of all the spicy condiments, this might be the very easiest,
requiring just two things, fresh peppers and a lot of time.
We're gonna preheat our oven to 200 degrees.
Cut the tops of the peppers and arrange them evenly
between two half sheet trays lined with aluminum foil.
Place in the oven and dry them out, six to 12 hours.
Watch closely because you don't want to burn the peppers,
just dehydrate them.
Wow, look at those wrinkly mother(bleep).
In batches, pulse the dried chilies
in a bowl of a food processor until they're coarsely ground.
Then transfer them to a jar and they'll keep
for up to six months.
(bounce)
Hot sauce, chili oil, pepper flakes.
Now you have everything that you need
to set your mouth on fire over, and over,
and over, and over, and over again.
And all you needed, was a little help.
(salsa music)
I started yelling at the end there.
- [Woman] You're really excited.
- Guess what, it's good! Okay.
(beep)
Thank so much for watching.
Don't forget to check out our other Thrillist videos
and like, comment, and subscribe.
-------------------------------------------
How to make a man go crazy for you - Duration: 4:29. For more infomation >> How to make a man go crazy for you - Duration: 4:29.
 -------------------------------------------
How To Make Chocolate Cake Decorating Videos 😍 Amazing Chocolate Cakes Decoration Compilation - Duration: 11:14.
How To Make Chocolate Cake Decorating Videos
-------------------------------------------
I Tried To Make A Giant Ostrich Egg McMuffin - Duration: 5:59.
- Hey guys, it's Inga.
Today, we're gonna be doing something
a little bit different.
My friend Ade gave me an ostrich egg.
Ta-da!
He challenged me to make a giant Egg McMuffin.
(laughing nervously)
We only have one ostrich egg.
It is not a cheap egg.
The stakes are very high,
but let's make it work.
We're gonna start off by making the English muffin part.
So I looked up some recipes,
and I made the dough last night.
(whimsical big band music)
So here's the dough.
Flour, moment of truth.
Oh, ho!
Look at how much air this has.
I'm gonna knead this gently.
Ooh.
It's so smooth.
(whimsical big band music)
I need to roll this out.
- [Man] You gotta do that.
- Gotta roll it.
Like pizza.
(light jazzy music)
That looks pretty decent.
They said sprinkle pretty generously.
I think I'm being very generous.
It smells so good.
And we're gonna cut it.
Ooh la la.
Now this is what it looks like right now.
This is the muffin.
(giggling)
(clattering)
We're gonna let this prove for a little over an hour.
We can start working on the ostrich egg.
Dun-dun-dun.
You hear that?
Like a china plate.
Very smooth.
Even though it has bigger pores than I do.
(clinking repeatedly)
(gasping)
(clattering)
It's beginning to crack.
(clinking repeatedly)
(light jazzy music)
Oh my God.
The membrane!
Why is it so full?
Ah!
I don't know what to do.
Oh.
(light jazzy music.
- [Man] It's gonna be a crunchy Egg McMuffin.
- Oh!
I'm shaking.
(gasping)
(light jazzy music)
Ta-da!
It looks like egg?
That was the hardest part.
I'm gonna pour this in the mold now.
(laughing)
I'm gonna put it in the oven, okay?
Oh my God, it's leaking.
Oh my God.
(big band music)
We're gonna go with 350.
Make it a little lower.
Okay, let's check on that later.
We're going to transfer this huge piece of bread
to the cast iron.
How does one transfer this?
Ah.
No, no, no, flip it.
(laughing)
Wow, that was a complete and utter failure.
We're just gonna wait now,
until it becomes golden brown.
(light jazzy music)
I think it's about that time.
Look at it!
Yay!
Wow.
Wah!
Put it on this heated baking sheet.
(light jazzy music)
I'll put it in the oven.
Bye-bye.
See you later.
It's all coming together now.
Beautiful ostrich egg.
I'm so excited.
(clanging)
So while I'm waiting for these to cool down,
I am going to pan fry these super thick cut,
by thick, I mean, damn, this is thick.
Check it out!
Perfect for a giant Egg McMuffin.
(sizzling)
Huh!
Okay, so you're only supposed to open these with a fork,
so I found a giant fork-ish thing.
Let's try.
(light jazzy music)
Ooh.
(mimicking fanfare)
English muffin!
I'm so happy!
So we're gonna butter these slices up,
make it extra greasy, extra yummy.
Hey, hey.
And these are going back in the oven.
So we're gonna do the most important part now.
For research purposes, the original Egg McMuffin.
You see the bread on top, the ham, the egg, the cheese.
So that's how we're gonna build ours.
Here we go.
Ta-da.
I could not find a giant piece of cheese,
so we're gonna have to do this one by one.
This is the moment we've been waiting for.
(imitating fanfare)
Wow, how do you take this off?
Whoa!
Now we're gonna put the ham.
Ta-da!
And we're gonna cover it up.
And this, my friends, is the beautiful,
giant Egg McMuffin.
The only thing missing is that we need to get the cheese
just like this, super melty.
Dun-dun-dun.
Wow!
Original one.
It looks kinda alike, right?
(laughing)
Wow, guys.
I did it.
I didn't think I would be able to do it, but I did it.
The real test is does it taste like it?
We don't know.
I'm gonna have my friends and my coworkers reveal the truth.
I'm nervous.
(jazzy big band music)
(group gasping and ah-ing)
- Oh, yes.
This thing itself is the size of an Egg McMuffin.
(whimsical big band music)
It tastes exactly like an Egg McMuffin.
- Yay!
(whimsical big band music)
Yay, I did it!
Until next time.
Bye-bye.
(whimsical big band music)
- Hey, Unsolved is on a new channel.
And now your part. - Subscribe here.
- That was my part.
-------------------------------------------
How To Control Others Mobile | How To Make Calls From Others Mobiles | Call India App - Duration: 5:21.
How To Control Others Mobile
How To Make Calls From Others Mobiles
Call India App
Không có nhận xét nào:
Đăng nhận xét