Click On Subscribe>>>
For more infomation >> Aerodynamics(Air Flow) Analysis on a Racing Car|| Ansys Fluid Flow (Fluent) || Ansys Workbench 18.1 - Duration: 15:06.-------------------------------------------
How to Draw and Color Golf Car | Golf Car Coloring Page | Learn Colors - Duration: 2:09.
How to Draw and Color Golf Car
Golf Car Coloring Page | Learn Colors
-------------------------------------------
Car fire extends to Bloomfield home - Duration: 0:17.
-------------------------------------------
Tomica Cars & City | Easy Movie for Kids | Cars Toys Movie | Excavator Toys | Cars Kids BestkidsToys - Duration: 2:53.
Tomica Cars & City | Easy Movie for Kids | Cars Toys Movie | Excavator Toys | Cars Kids BestkidsToys
-------------------------------------------
-={Tutorial}=- Simple No-E2 ACF Car - Duration: 30:21.
Hello, and welcome back.
The first thing you'll notice is that this video is completely different from what I usually post
I don't spend as much time on animation as I used to,
...so today, I will be teaching you a little bit of what I do instead.
In this particular video, I will be showing those of you who play the game 'Garry's Mod'
...how to make an ACF powered car-without the use of any e2.
The addons required for making the vehicle displayed in this video, are as follows:
ACF, SProps, Precision Alignment(optional), Stacker(optional), Wiremod, and Axis Centre.
The links to these addons will be provided in the description below.
With that being said, I hope you enjoy the video.
So to start off this tutorial, why don't you get out a baseplate, preferably a longer one.
And place it somewhere in the air, so we can work underneath it if we have to.
After that, grab any particular wheel, something that maybe fits the sizes of our baseplate.
This is a little bit big, so I'll choose something else.
*literally grabs the same two wheels, what a moron lololol*
This will work.
So place it next to your vehicle.
Anywhere is fine, as long as you have Axis Centre.
Now, using Stacker, we will line up the wheels by placing one somewhere in the front, like this.
And that should work just nicely.
Now, using Precision Alignment, to keep the wheels aligned on the other axis, we will attempt symmetry.
By doing.... THIS(Presto! :D) with Precision Alignment.
We define the plane, we select the wheel, we open the menu, we go to Rotation Functions,
...click Mirror Across Plane, click Plane 1, hold shift and click Rotate Entity.
And now, you can see, we have a wheel on the other side.
For the other wheel, you can just hold shift, and right click.
And that is duplicated.
Now, to attach some of these wheels, we will use Axis Centre.
You can apply any amount of friction you want; I have 20 on here.
So left click the side of the wheel, then you can click anywhere on the plate.
So we'll do that with the other wheel now. And we'll call this the back,
...because we can't Axis Centre all the wheels. We need some of them to turn.
So we will call this the back, and we will call this the front.
...unless you car typically steers from the back..(xd)
SO.
With those set, we will grab two smaller props: Thinner, smaller.... longer(relatively).
I will use this one for both sides.
And place them, right up around where the wheel is.
This is what we will attach our front wheels to.
Now, it's important that - before you axis these - you use Precision Alignment to mirror them,
...because we need some degree of exactness when we're making the mechanisms of this vehicle.
And if you try to use Precision Alignment AFTER you axis the wheel, it'll break.
So getting out Axis Centre again, axis the front wheel to the plate, for both sides.
And now Axis Centre the top of this plate to the baseplate.
So now we have basic steering... kind of pivot frames here. Now before we do anything else,
...let's set the weight, some decent weight for our vehicle.
So the wheels are 100, but the engines and the components we're gonna be using are probably gonna be heavier,
...so we'll set the weight of these wheels to 500.
And to avoid some sagging, we will need to set the baseplate and these props to something a little bit heavier.
So I chose 650, for the weight of these steering frames.
And we'll make the overall weight 800 for now. We may change this later, for stability purposes.
Now, looking through the menu, the next components we will need are... the Rope tool.
Make sure you have Rigid checked, that there is no added length, and that there is no Force Limit.
Now, using the Rope tool, click on one edge of one of the steering frames, and click on the opposite.
And do the same for the back of these plates.
What this will do, is it will guide our steering plates to turn at the same time.
As you can see.
Now as you installed Axis Centre, you probably came with some ballsocket tools,
...and hopefully, you came with Ballsocket Advanced.
Now this is an extra, but this can help with stability,
...if you're sagging a little bit when you're driving.
So with Ballsocket Advanced, with these settings(pause if you want),
...take the tool, click on the very center of one of your steering plates, and the center of another.
So there's hardly any, well, change in their kinda tilt now.
So as you can see, same effect, but this adds more stability by forcing a rotation constraint on them,
...rather than using Rope constraints. I like to use both for maximum stability.
So now we have our basic steering setup, and that's all nice and good.
Now, the next component we will need is a seat.
You can grab any old seat you want.
I will particularly use a Jeep seat, as I did with the example car at the start of this video.
Now, you can place this seat anywhere, I will just use one for this vehicle because one is all we need.
You can put as many as you like, or as many as your plate will allow.
Okay. So this will just be in the front. Could be anywhere, no limits.
-------------------------------------------
[ CC TUTO #1 ] Panne de GAZ en CAMPING-CAR : le CAUCHEMAR ! - Duration: 4:21.
-------------------------------------------
P-Plate Vlog #01: Initiating My New Car! - Duration: 5:01.
Oh my gosh!
Siala, Elaine!
Boss got me a car!
Hey, what's up guys!
My name's Shafiah and I'm from Motorist.sg.
So today, when I came into office, there's a car key on my desk, and a letter for me.
Let me show you guys the letter.
So basically, I just passed my driving license not long ago, and the company has decided
to get me a car, for me to learn everything I need to know as a p-plate driver.
And I will have to produce 1 video a week to document my journey and experience of owning
my first car.
Actually I think my boss is pranking me for April Fool's because last year I pranked him
big time.
I will put the link in the description box below if you guys wanna watch it.
Anyway, here's the key, so let's go to the carpark and we shall see!
Oh my gosh, this is the car?!
Okay seriously?
What car is this sia?!
Still got company logo, oh my gosh!
Oh my goodness!
There's a logo at the back!
Okay guys, so for the first video, I'm supposed to initiate the car.
Okay, here we go!
Okay I'm turning on the engine...
My gosh it's so hot, there's no aircon...
Let me turn on the aircon...
Eh, what's this lever?
Okay let me check the car manual guys!
So it's the air inlet selection lever, for recirculation or outside air.
Let me just adjust my seat first.
Okay...
Eh...
How come I still cannot see the front?!
Oh...
Eh?
Cannot adjust the seat higher one, ah?
Whaaat?!
Okay so now I can adjust my rear mirror...
Okay...
So for the side mirrors, you actually need to keep 1/5 of your car in the mirror, and
then...
Uh, make sure you have a clear view of the lanes beside you.
So, like that.
Okay now let's turn on some music.
So guess what?
I cannot tune in to anything above 89.9, and so the maximum is 89.7FM.
Umm, if any of you guys have a solution, can you please let me know in the comments section
below, I really don't know why.
Okay, so let's move on!
I'm testing the wiper.
Okay, now I'm checking out the lights.
I've got my colleague John to help me.
Right signal.
Have.
Left signal?
Have.
Headlights?
Have.
High beam?
Have.
Brake lights?
Have.
Okayyy, and finally, hazard light.
Have.
Okay bye, thanks John.
Anddd, finally, I will pop...
Pop the bonnet, the petrol cap, the boot...
Eh?
There's no boot lever, tsk.
Anddd, a champagne!
Okay guys, I'm kidding.
This one haram.
So apparently if your car doesn't have an internal boot lever like my car, you just
open it from the back, because the boot lever is just at the back.
Like that.
Ya.
Petrol cap, check.
Ahhh, okay.
Sooo...
There's this lever that you actually need to pull up first so that you can open the
bonnet.
And then once you open it, you will find the stick.
There needs to be a stick that you need to put to a hole, so that it can stand.
So apparently, the stick for this car is here.
You need to put it inside the hole.
There.
Okayyy, so when you release, you need to throw it up a bit higher.
Okay guys, so I've also branded my car with...
THE HALL OF SHAME.
It is to tell everyone that I'm a noob driver, and keep a distance away from me.
So that's it!
I've initiated the whole car, and if you guys have learnt something too, and wanna join
in my noob experience as a p-plate driver, don't forget to subscribe, and tune in next
week to find out what I'll be exploring next.
In the meantime, if you see me on the roads, don't forget to give me a friendly horn!
Bye!
-------------------------------------------
Simple 3D Products Automotive wax for professional car detailing - Duration: 2:52.
[Music]
we appreciate you taking the time to check us out of 3DProducts.com
Facebook YouTube and really getting the understanding of what we're trying to
accomplish here and what you're looking at when you're going to shop for a wax
it can be confusing that I get it you know we have all sorts of different
waxes thing is if you want high quality great long lasting life with ease of use
HD poxy it doesn't get really get much better for you it's liquid wax put on an
application can gone with machine so it's easy not a lot of elbow grease or
it can go on by hand it's a perfect easy on Easy Off great durability you want
that group deep wet high-gloss showroom shine and you have to be a more
controlled environment than 3d carnauba paste waxes where it's easy on Easy Off
in a controlled environment remember you don't want to let it sit too long
because you're just looking to get kind of that depth candy shell look to it and
that's what that's going to be for you not gonna give you the longest
durability but will give you some durability anywhere in between you got
your carnauba and your cherry wash gonna give you a quick wet look that you
are looking for is gonna last about week maybe two something gonna put on more
frequently and then of course the HD Express wax doesn't get much easier than
that spray it on let it flash wipe it off you're ready to go on date night you
know have a couple days of durability now all waxes are susceptible to being
removed through degreasers they're easy on or you know they can be durable
to a point there are sacrificial layer between the elements now degreasers
are gonna take these off wax is the grease so the degreaser will kill them
so make sure you you're aware of what kind of car wash you're going through if
you sit there and you say well I just got my car wax it should be fine why is
it not beading anymore? It could be because you went through a cheaper car
wash you're using lower pH or higher pH levels in their car wash it's going to
strip all that wax that you paid for on that detail so make sure when you go
through we recommend again to combine some of the 3D products we have perfect
ph balance with our 3D Pink Car Soap our Wash and Wax our Waterless Car Wash
these are things to help maintain that time and effort you put in.
now we've gone through we put HD poxy right here
3D Carnauba Paste Wax 3D carnauba wax Cherry Wax and 3D Express Wax. All great
showroom shines all great gloss the difference is going to be durability and
a little bit more depth of gloss we appreciate you stopping by I'm Donald
Williams the 3D International we'll see you next time
[Music]
-------------------------------------------
Shraddha Kapoor Lifestyle 2018 | Baaghi 2 Actress |House Family Car| Shraddha Kapoor Biography 2018 - Duration: 2:15.
Shraddha Kapoor Lifestyle 2018 Baaghi 2 Actress Shraddha Kapoor House Family Car Net worth Shraddha Kapoor Biography 2018
-------------------------------------------
நடிகையின் மகள் CAR DRIVER உடன் சேர்ந்து செய்த வேலைய நீங்களே பாருங்க | Tamil News Kollywood Cinema - Duration: 1:00.
-------------------------------------------
New Study: Teens With ADHD Are More Likely To Get Into A Car Crash - Duration: 0:59.
-------------------------------------------
Smart Car Seat Helps Prevent Child Hot Car Deaths - Duration: 2:25.
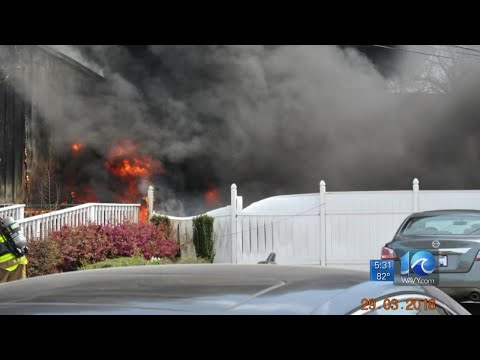
-------------------------------------------
Discarded cigarettes likely behind car dealership fire, officials say - Duration: 2:19.
-------------------------------------------
Need A New Car or Truck - Today? | Like This Guy? | Zappone Chrysler Jeep Dodge RAM | 12065 & 12832 - Duration: 0:11.
( Crash - Bang - BOOM! )
Need a new car?
( You OK ? )
Zappone Chrysler Jeep Dodge RAM * Clifton Park & Granville
-------------------------------------------
Safari-Goer Winds up in Car with a Cheetah - Duration: 0:51.
-------------------------------------------
Car crashes into northeast Albuquerque house - Duration: 0:42.
-------------------------------------------
MTB Car Park Challenges II |SickSeries#45 - Duration: 16:59.
hey guy´s, it´s us again, sick series
and today with a "old" guest who is known from the long jump challenge
yeah, it´s Stefan Eberharter
vice worldcamp and european camp
so he is a real pro athlete
and today we are doing the "Carpark Challenge number 2"
what?
two
we will start again with the longjump because we finished with it the last time
right
we have some red bull cans, so let´s go
we have a wall of red bulls
so this is the take off, you have to jump over these
and there is a gap
and you have to jump over the second red bull wall
winner will be the guy with the widest distance
Schnig Schnag Schnug who will win
yeah, Sick Series is back
so Stefan will start
you touched the can at the take off
pretty difficult because you have to take off earlier to get the high of the cans
Stefan is out on the first round
so now it´s our game who will win
ok, you will be the next one
so now it´s my turn
But I would have made it easily
first point is mine
noo, I easily had the distance
I would say we go on to the next game
next challenge fakie
we will start from there
fakie down and through the both cans
and the distance of the cans getting tighter and tighter
so until one will be the last
have a look how stefan can drive backwards
so you´re allowed to hop
but you aren´t allowed to stop
so Fabio is next
nooo
this was bad
thought I will do it easy without jumping haha
so fast is the game over! :-)
so i will be the next one
ok, made it
so now tighter
sick
now it´s gonna be tight
and we have a winner
So Stefan has a point, I have a point
Elias, it was close
So the game will be finished if one of us has 3 points
we build up a parcour for a hands free challenge
we have some parcour like in skiing
big slalom in small haha
and you have to ride it without your hands
pretty difficult to find the right speed and balance
the guy who came the furtherst will get the point
stefan will start again
looks like he had some training session
this turn was pretty difficult
so now it´s your turn Fabio
pretty difficult haha
oi, that´s not bad
not bad dude
so now it´s my turn
haha nearly thought the finish line was erlier haha
so we will do a fight right?
so a fight right?
he will change the parcour
so we changed the parcour
so it´s the other way
but the finish line is on the top of the rollers - and this is pretty difficult
ok, Fabio will start
this is the fight
first turn
and now
the fight is hard, so now it´s my turn
noo
2 point´s - 1 point and zero points
next challenge, this one could be for stefan
Goal will be to jump sideways through the cans
and the distance of the cans getting tighter and tighter
this could be perfect for a trials athlete
i would be nervous
perfect!!
this is something I´m good in it haha
perfekt
mr nohand will do some sidehops??
limit haha
but we will take that haha
Also the Dowhill riders are able to do sidehops haha
it´s gonna be tighter and tighter
now it needs precision
are you serious?
I think it can´t be scatchier
perfect
for me it´s going to be over haha
are you serious??
I will destroy you haha
20 cm I guess
now it´s going to be tricky
so we will have a look at it
are you serious?
unbelievable
unbelievable
the two trial athletes are back haha
ahaha what a firework haha
fair play!! Not bad - really
the poor red bull
don´t think that we can do this
normally I´m pretty optimistic, but now not haha
Fabio Wibmer and Stefan Eberharter
the guy´s are crying
no winner from the challenge
it was to tight
right
next challenge!
next challenge, each of us has his lucky can
dropping down onto it that the can is smashed
let´s go, stefan will start
are you serious?
not bad
have a look at it!
the take off was pretty bad
so have a look at it, the can is good
wow, that was tight
are you serious?
So stefan will get the pont - so the standing is 2:2:0
so I think we will come to the last deciding game
come from there, stoppie trough the two cans
till one of us smashes a can or can´t hold the stoppie long enough
you have to come over the cans with your backwheel while holding the stoppie
so that it´s gonna be interesting, we will go longer and tighter
the motto of the "Carpark Challenge number 2"
now it´s going to be tricky
pretty pretty good dude
sick dude
didn´t thought that I´ll make it
now it´s time
longer and tighter
are you serious?
from here, to there
it´s gonna be so tight
it´s maybe to tight for us haha
this is really next level!
think you can´t ride normally trough the cans
he won´t make it
are you serious?
so now it´s your turn
yooo, pretty close to fail but made it
i will smash your title haha
I think we have to go longer and tighter
you bounced the can hahah
but you´ve also a try now
sick game!!
are you serious??
guy´s, we can´t see a end - we have to go tighter and longer - no we can´t go tigher haha
who will make it first
my backwheel wasn´t over the cans right?
I thing I was down before
ok, we will do a Videoreplay
yeah, so let´s have a look on the videoreplay
Replay said, that the backwheel touched the ground before the cans
but we will go on till one of us will make it haha
hahaha with your backwheel haha
but I´ve a try left... how manny tries did we need till now? a lot!!
your backwheel
pretty sick
yeah, congrats to the winner - 3 points
so thanks for watching, we hope you guy´s enjoyed it... was a pretty sick session
thanks stefan, you rocked!
small difference between the trials and downhill athletes haha
till the next time!
don´t forget to get yourself the sickest merch in the game
mudguards are back in stock
so in the case of bad weather and rain - sick series mud guards are perfekt!! :-)
thanks and see you the next time
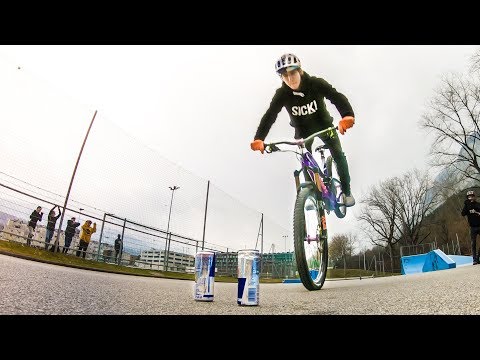
Không có nhận xét nào:
Đăng nhận xét